
业务流程
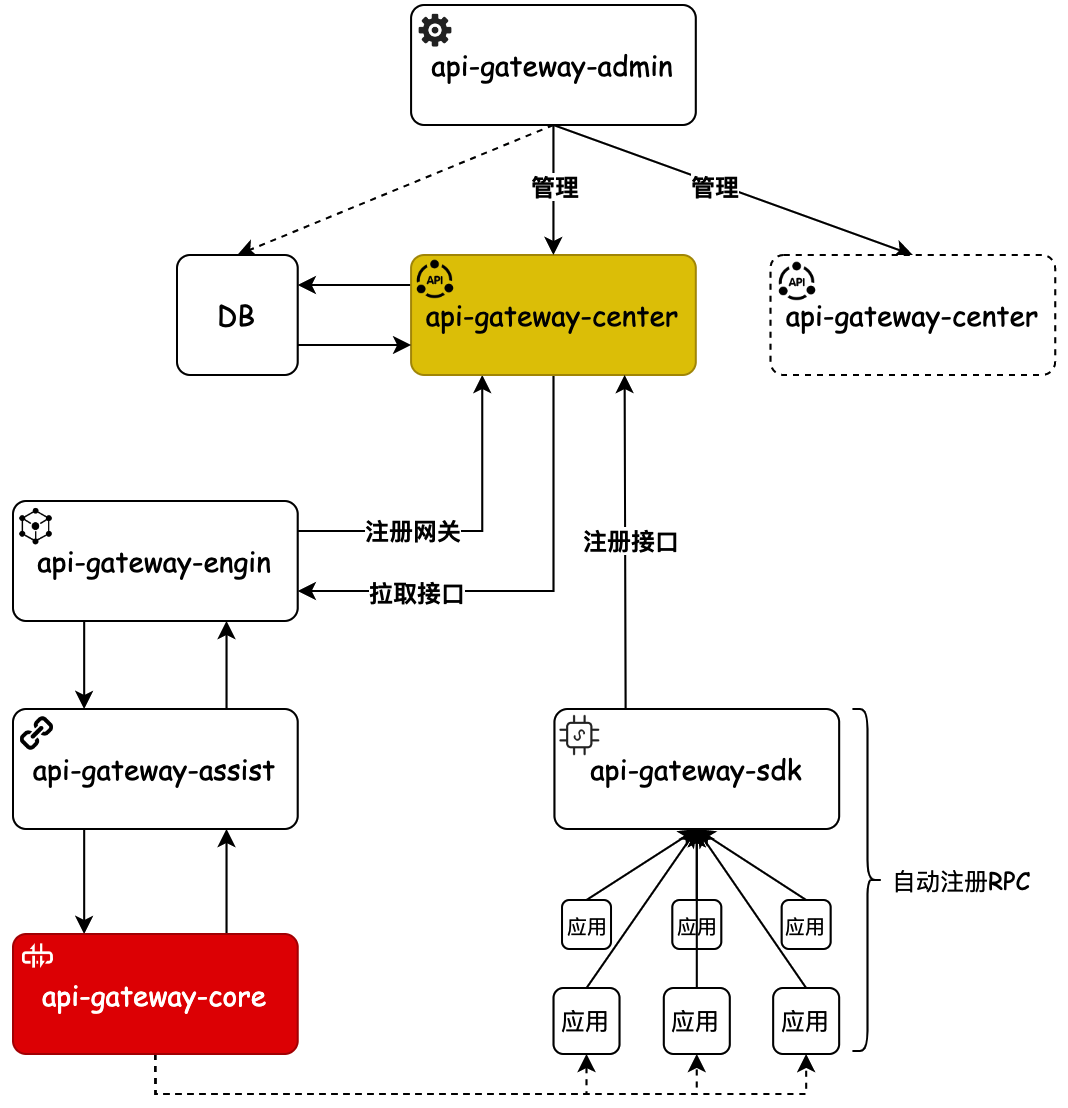
网关项目的整体架构设计如下:
现在对于api-gateway-core这个通信组件的功能已经基本全部开发完成,对于api-gateway-assist这个starter的开发基本功能也已经完善,但是在我们在之前测试的时候发现,我们的测试总是对于这个网关整体的架构设计不够完善。因为对于api-gateway-engine,api-gateway-assist,api-gateway-core这三样东西其实是一组的东西,我们之前直接拿的api-gateway-assist进行测试总归是不够完整的。因此本节我们就来创建api-gateway-engine工程,并对api-gateway-engine,api-gateway-assist,api-gateway-core这一组的东西进行整体性的测试。
我们之前提到过,我们将api-gateway-core当作一个mybatis,将api-gateway-assist当作包装mybatis的starter,而api-gateway-engine就相当于直接进行应用的一个springboot。因此api-gateway-engine 是一个用于启动网关算力服务的引擎工程,它的代码内容几乎没有多少,主要负责的是工程的启动操作(就像springboot引入了很多pom依赖,本身很多功能都由依赖来完成,自身只负责讲这些依赖组合启动)。如下图
api-gateway-core 核心通信模块,处理网关的对接口的协议转换和映射操作以及泛化调用对应的 RPC 接口
api-gateway-assist 将 api-gateway-core 包装,提供简化的使用方式。
那么现在 api-gateway-engin 则是一个打包的执行引擎工程,打包后提供可部署到容器的 Jar 包。
业务实现
基本实现
api-gateway-engine的项目结构如下:
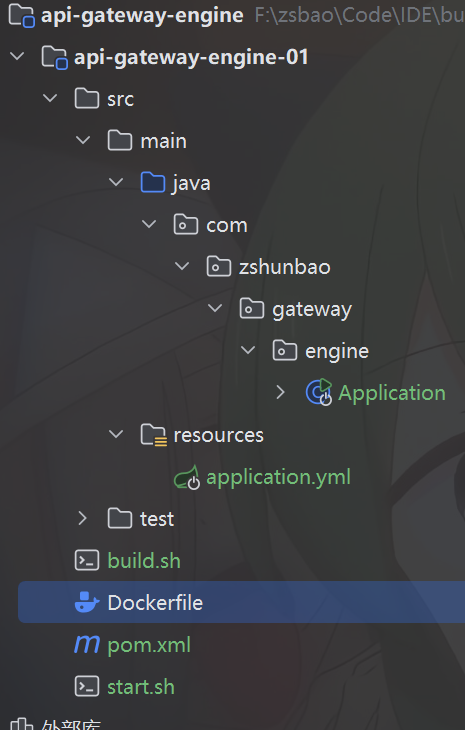
其中Application.java,这就是一个最简单的springboot启动类
package com.zshunbao.gateway.engine;
import org.springframework.beans.factory.annotation.Configurable;
import org.springframework.boot.SpringApplication;
import org.springframework.boot.autoconfigure.SpringBootApplication;
import org.springframework.boot.autoconfigure.jdbc.DataSourceAutoConfiguration;
/**
* @program: api-gateway-engine
* @ClassName Application
* @description: 启动服务
* @author: zs宝
* @create: 2025-08-28 15:13
* @Version 1.0
**/
@SpringBootApplication(exclude = DataSourceAutoConfiguration.class)
@Configurable
public class Application {
public static void main(String[] args) {
SpringApplication.run(Application.class, args);
}
}
真正对于这里重要的是我们需要引入api-gateway-assist。
不过在这之前我们有一些小修改
其一,在api-gateway-core的netty服务中,由于我们后续会将api-gateway-engine打包部署到docker上来进行api-gateway-engine,api-gateway-assist,api-gateway-core的联合测试,docker会为服务自动分配ip,因此对于其中的GatewaySocketServer.java中的原本是
channelFuture = b.bind(new InetSocketAddress(configuration.getHostName(),configuration.getPort())).syncUninterruptibly();要修改为如下:
/**
* @program: api-gateway-core
* @ClassName GatewaySocketServer
* @description: 网关会话服务端
* @author: zs宝
* @create: 2025-07-25 16:48
* @Version 1.0
**/
package com.zshunbao.gateway.core.socket;
import com.zshunbao.gateway.core.session.Configuration;
import com.zshunbao.gateway.core.session.defaults.DefaultGatewaySessionFactory;
import io.netty.bootstrap.ServerBootstrap;
import io.netty.channel.Channel;
import io.netty.channel.ChannelFuture;
import io.netty.channel.ChannelOption;
import io.netty.channel.EventLoopGroup;
import io.netty.channel.nio.NioEventLoopGroup;
import io.netty.channel.socket.nio.NioServerSocketChannel;
import org.slf4j.Logger;
import org.slf4j.LoggerFactory;
import java.net.InetSocketAddress;
import java.util.concurrent.Callable;
//实现异步调用接口,使整个会话服务端的过程异步建立
public class GatewaySocketServer implements Callable<Channel> {
private final Logger logger = LoggerFactory.getLogger(GatewaySocketServer.class);
private EventLoopGroup boss;
private EventLoopGroup worker;
private Channel channel;
private DefaultGatewaySessionFactory gatewaySessionFactory;
private final Configuration configuration;
public GatewaySocketServer(Configuration configuration,DefaultGatewaySessionFactory gatewaySessionFactory) {
this.gatewaySessionFactory = gatewaySessionFactory;
this.configuration = configuration;
this.initEventLoopGroup();
}
private void initEventLoopGroup() {
boss=new NioEventLoopGroup(configuration.getBossNThreads());
worker=new NioEventLoopGroup(configuration.getWorkNThreads());
}
@Override
public Channel call() throws Exception {
ChannelFuture channelFuture=null;
try {
ServerBootstrap b=new ServerBootstrap();
b.group(boss,worker)
.channel(NioServerSocketChannel.class)
//设置 TCP 最大连接等待队列
.option(ChannelOption.SO_BACKLOG,128)
.childHandler(new SessionChannelInitializer(gatewaySessionFactory,configuration));
//InetSocketAddress 是 Java 用于表示“IP + 端口”的地址对象
//syncUninterruptibly() 会阻塞直到启动完成(不抛出异常)
// Docker 容器部署会自动分配IP,所以我们只设定端口即可。
// channelFuture = b.bind(new InetSocketAddress(configuration.getHostName(), configuration.getPort())).syncUninterruptibly();
channelFuture = b.bind(configuration.getPort()).syncUninterruptibly();
this.channel=channelFuture.channel();
}catch (Exception e){
logger.error("socket server start error.", e);
}finally {
if(null!=channelFuture && channelFuture.isSuccess()){
logger.info("socket server start done.");
}else{
logger.error("socket server start error.");
}
}
return channel;
}
}修改完后,对应的api-gateway-core要进行,先clean,再重新打包install
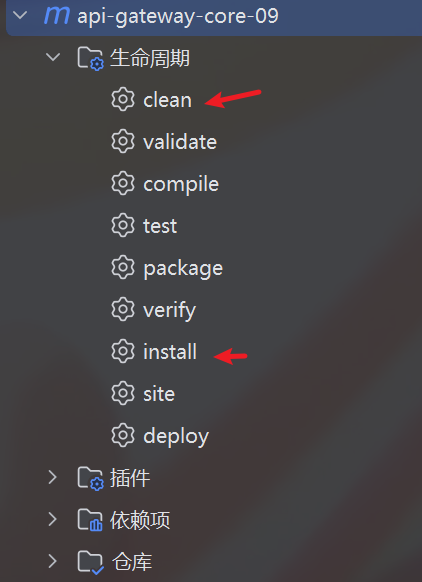
其二对于api-gateway-assist由于api-gateway-core修改了代码,重新打包了,那么api-gateway-assist也需要先clean然后重新打包install,这样api-gateway-engine引入的依赖才是正确的
所以接下来对于api-gateway-engine的pom文件为
<?xml version="1.0" encoding="UTF-8"?>
<project xmlns="http://maven.apache.org/POM/4.0.0"
xmlns:xsi="http://www.w3.org/2001/XMLSchema-instance"
xsi:schemaLocation="http://maven.apache.org/POM/4.0.0 http://maven.apache.org/xsd/maven-4.0.0.xsd">
<modelVersion>4.0.0</modelVersion>
<groupId>com.zshunbao.gateway</groupId>
<artifactId>api-gateway-engine-01</artifactId>
<version>1.0-SNAPSHOT</version>
<packaging>jar</packaging>
<parent>
<groupId>org.springframework.boot</groupId>
<artifactId>spring-boot-starter-parent</artifactId>
<version>2.6.0</version>
<relativePath/>
</parent>
<dependencies>
<dependency>
<groupId>org.springframework.boot</groupId>
<artifactId>spring-boot-starter-web</artifactId>
</dependency>
<dependency>
<groupId>org.springframework.boot</groupId>
<artifactId>spring-boot-starter-test</artifactId>
<scope>test</scope>
</dependency>
<dependency>
<groupId>com.alibaba</groupId>
<artifactId>fastjson</artifactId>
<version>1.2.78</version>
</dependency>
<dependency>
<groupId>org.apache.commons</groupId>
<artifactId>commons-lang3</artifactId>
<version>3.8</version>
</dependency>
<dependency>
<groupId>junit</groupId>
<artifactId>junit</artifactId>
<version>4.12</version>
<scope>test</scope>
</dependency>
<dependency>
<groupId>cn.hutool</groupId>
<artifactId>hutool-all</artifactId>
<version>5.5.0</version>
</dependency>
<dependency>
<groupId>org.apache.dubbo</groupId>
<artifactId>dubbo</artifactId>
<version>2.7.5</version>
</dependency>
<dependency>
<groupId>org.apache.zookeeper</groupId>
<artifactId>zookeeper</artifactId>
<version>3.4.13</version>
</dependency>
<dependency>
<groupId>org.apache.curator</groupId>
<artifactId>curator-framework</artifactId>
<version>4.0.1</version>
</dependency>
<dependency>
<groupId>org.apache.curator</groupId>
<artifactId>curator-recipes</artifactId>
<version>4.0.1</version>
</dependency>
<dependency>
<groupId>cglib</groupId>
<artifactId>cglib</artifactId>
<version>3.3.0</version>
</dependency>
<dependency>
<groupId>commons-httpclient</groupId>
<artifactId>commons-httpclient</artifactId>
<version>3.1</version>
</dependency>
<!-- https://mvnrepository.com/artifact/org.apache.shiro/shiro-core -->
<dependency>
<groupId>org.apache.shiro</groupId>
<artifactId>shiro-core</artifactId>
<version>1.3.2</version>
</dependency>
<!-- https://mvnrepository.com/artifact/io.jsonwebtoken/jjwt -->
<dependency>
<groupId>io.jsonwebtoken</groupId>
<artifactId>jjwt</artifactId>
<version>0.9.1</version>
</dependency>
<dependency>
<groupId>io.netty</groupId>
<artifactId>netty-all</artifactId>
<version>4.1.77.Final</version>
</dependency>
<!-- 网关助手 -->
<dependency>
<groupId>com.zshunbao.gateway</groupId>
<artifactId>api-gateway-assist-04</artifactId>
<version>1.0-SNAPSHOT</version>
</dependency>
</dependencies>
<build>
<finalName>api-gateway-engine-01</finalName>
<resources>
<resource>
<directory>src/main/resources</directory>
<filtering>true</filtering>
<includes>
<include>**/**</include>
</includes>
</resource>
</resources>
<testResources>
<testResource>
<directory>src/test/resources</directory>
<filtering>true</filtering>
<includes>
<include>**/**</include>
</includes>
</testResource>
</testResources>
<plugins>
<plugin>
<groupId>org.apache.maven.plugins</groupId>
<artifactId>maven-surefire-plugin</artifactId>
<version>2.12.4</version>
<configuration>
<skipTests>true</skipTests>
</configuration>
</plugin>
<plugin>
<groupId>org.springframework.boot</groupId>
<artifactId>spring-boot-maven-plugin</artifactId>
</plugin>
<plugin>
<groupId>org.apache.maven.plugins</groupId>
<artifactId>maven-compiler-plugin</artifactId>
<configuration>
<source>8</source>
<target>8</target>
</configuration>
</plugin>
</plugins>
</build>
</project>然后我们对于给api-gateway-assist和api-gateway-core使用的application.yml文件如下
server:
port: 8007
api-gateway:
address: http://10.16.81.112:8001 # 注册中心;从这里获取接口信息以及完成注册网关操作【你需要更换为你自己的IP】
groupId: 10001 # 网关分组;每一个网关通信组件都分配一个对应的分组
gatewayId: api-gateway-g4 # 网关标识;
gatewayName: 电商配送网关 # 网关名称
gatewayAddress: 10.16.81.112:7397 # 网关服务;网关的通信服务Netty启动时使用IP和端口【你需要更换为你自己的IP】其中要注意address和gatewayAddress处的ip地址要输入本机电脑的ip地址,如下,选择以太网适配器 以太网:的IPv4 地址(注意我们这里是连接的校园网络,如果电脑重启IP可能会发生变化)
C:\Users\hp-pc>ipconfig
Windows IP 配置
以太网适配器 以太网:
连接特定的 DNS 后缀 . . . . . . . :
IPv6 地址 . . . . . . . . . . . . : 2409:8760:1e81:10::1:6d97
本地链接 IPv6 地址. . . . . . . . : fe80::c3ba:1df:af54:1ce0%20
IPv4 地址 . . . . . . . . . . . . : 10.16.81.112
子网掩码 . . . . . . . . . . . . : 255.255.128.0
默认网关. . . . . . . . . . . . . : fe80::9203:25ff:fe52:a8f9%20
10.16.0.1
无线局域网适配器 WLAN:
媒体状态 . . . . . . . . . . . . : 媒体已断开连接
连接特定的 DNS 后缀 . . . . . . . :
无线局域网适配器 本地连接* 9:
媒体状态 . . . . . . . . . . . . : 媒体已断开连接
连接特定的 DNS 后缀 . . . . . . . :
无线局域网适配器 本地连接* 10:
媒体状态 . . . . . . . . . . . . : 媒体已断开连接
连接特定的 DNS 后缀 . . . . . . . :
以太网适配器 VMware Network Adapter VMnet1:
连接特定的 DNS 后缀 . . . . . . . :
本地链接 IPv6 地址. . . . . . . . : fe80::3580:7ab:d158:fe36%12
IPv4 地址 . . . . . . . . . . . . : 192.168.248.1
子网掩码 . . . . . . . . . . . . : 255.255.255.0
默认网关. . . . . . . . . . . . . :
以太网适配器 VMware Network Adapter VMnet8:
连接特定的 DNS 后缀 . . . . . . . :
本地链接 IPv6 地址. . . . . . . . : fe80::5b5c:c285:79ed:dc8e%2
IPv4 地址 . . . . . . . . . . . . : 192.168.163.1
子网掩码 . . . . . . . . . . . . : 255.255.255.0
默认网关. . . . . . . . . . . . . :
以太网适配器 蓝牙网络连接:
媒体状态 . . . . . . . . . . . . : 媒体已断开连接
连接特定的 DNS 后缀 . . . . . . . :
以太网适配器 vEthernet (WSL (Hyper-V firewall)):
连接特定的 DNS 后缀 . . . . . . . :
本地链接 IPv6 地址. . . . . . . . : fe80::e623:9b57:3dcc:dda%46
IPv4 地址 . . . . . . . . . . . . : 172.17.144.1
子网掩码 . . . . . . . . . . . . : 255.255.240.0
默认网关. . . . . . . . . . . . . :
C:\Users\hp-pc>当修改了IP地址后,对于网关注册中心api-gateway-center中我们的application_system表,其中的有关注册中心的地址也要注意修改。这里由于我们zookeeper也是部署到本地windows环境的docker环境中的(校园网电脑重启ip可能会变),因此和上面application.yml中的IP地址相同,如果是部署到服务器上的需要填写具体的服务器IP

在完成这一步后,接下来我们要干的就是为将api-gateway-engine部署到docker上测试做准备
部署流程
在部署之前,我们先将api-gateway-center和以往的RPC服务测试项目api-gateway-test启动,这是因为一旦api-gateway-engine部署成功,其中引入的starter api-gateway-assist会向注册中心发起注册和拉取。
然后我们再在docker中安装一个docker容器的管理面板Portainer,既可以让我们管理容器,也可以查看每个容器内的日志信息,安装过程很简单,依次执行以下命令即可
docker pull portainer/portainer
docker run -d --restart=always --name portainer -p 9000:9000 -v /var/run/docker.sock:/var/run/docker.sock portainer/portainer
做好上述准备后,我们接下来就进行部署的详细流程
对于将api-gateway-engine部署到docker上,首先我们需要创建api-gateway-engine的镜像包。
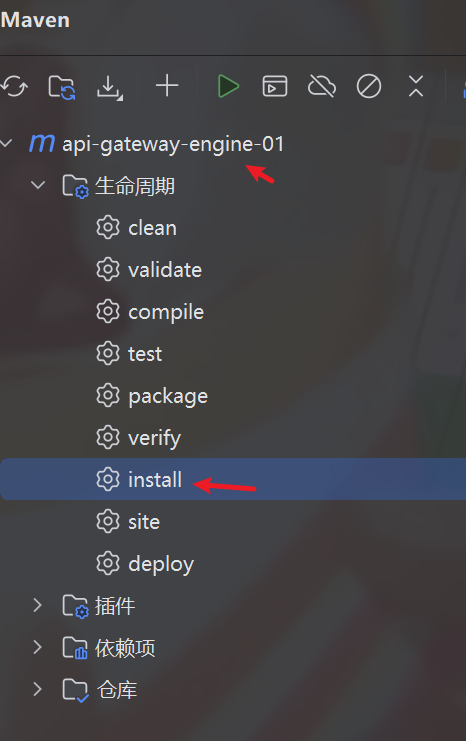
先将api-gateway-engine进行mavean install,得到其对应的jar包
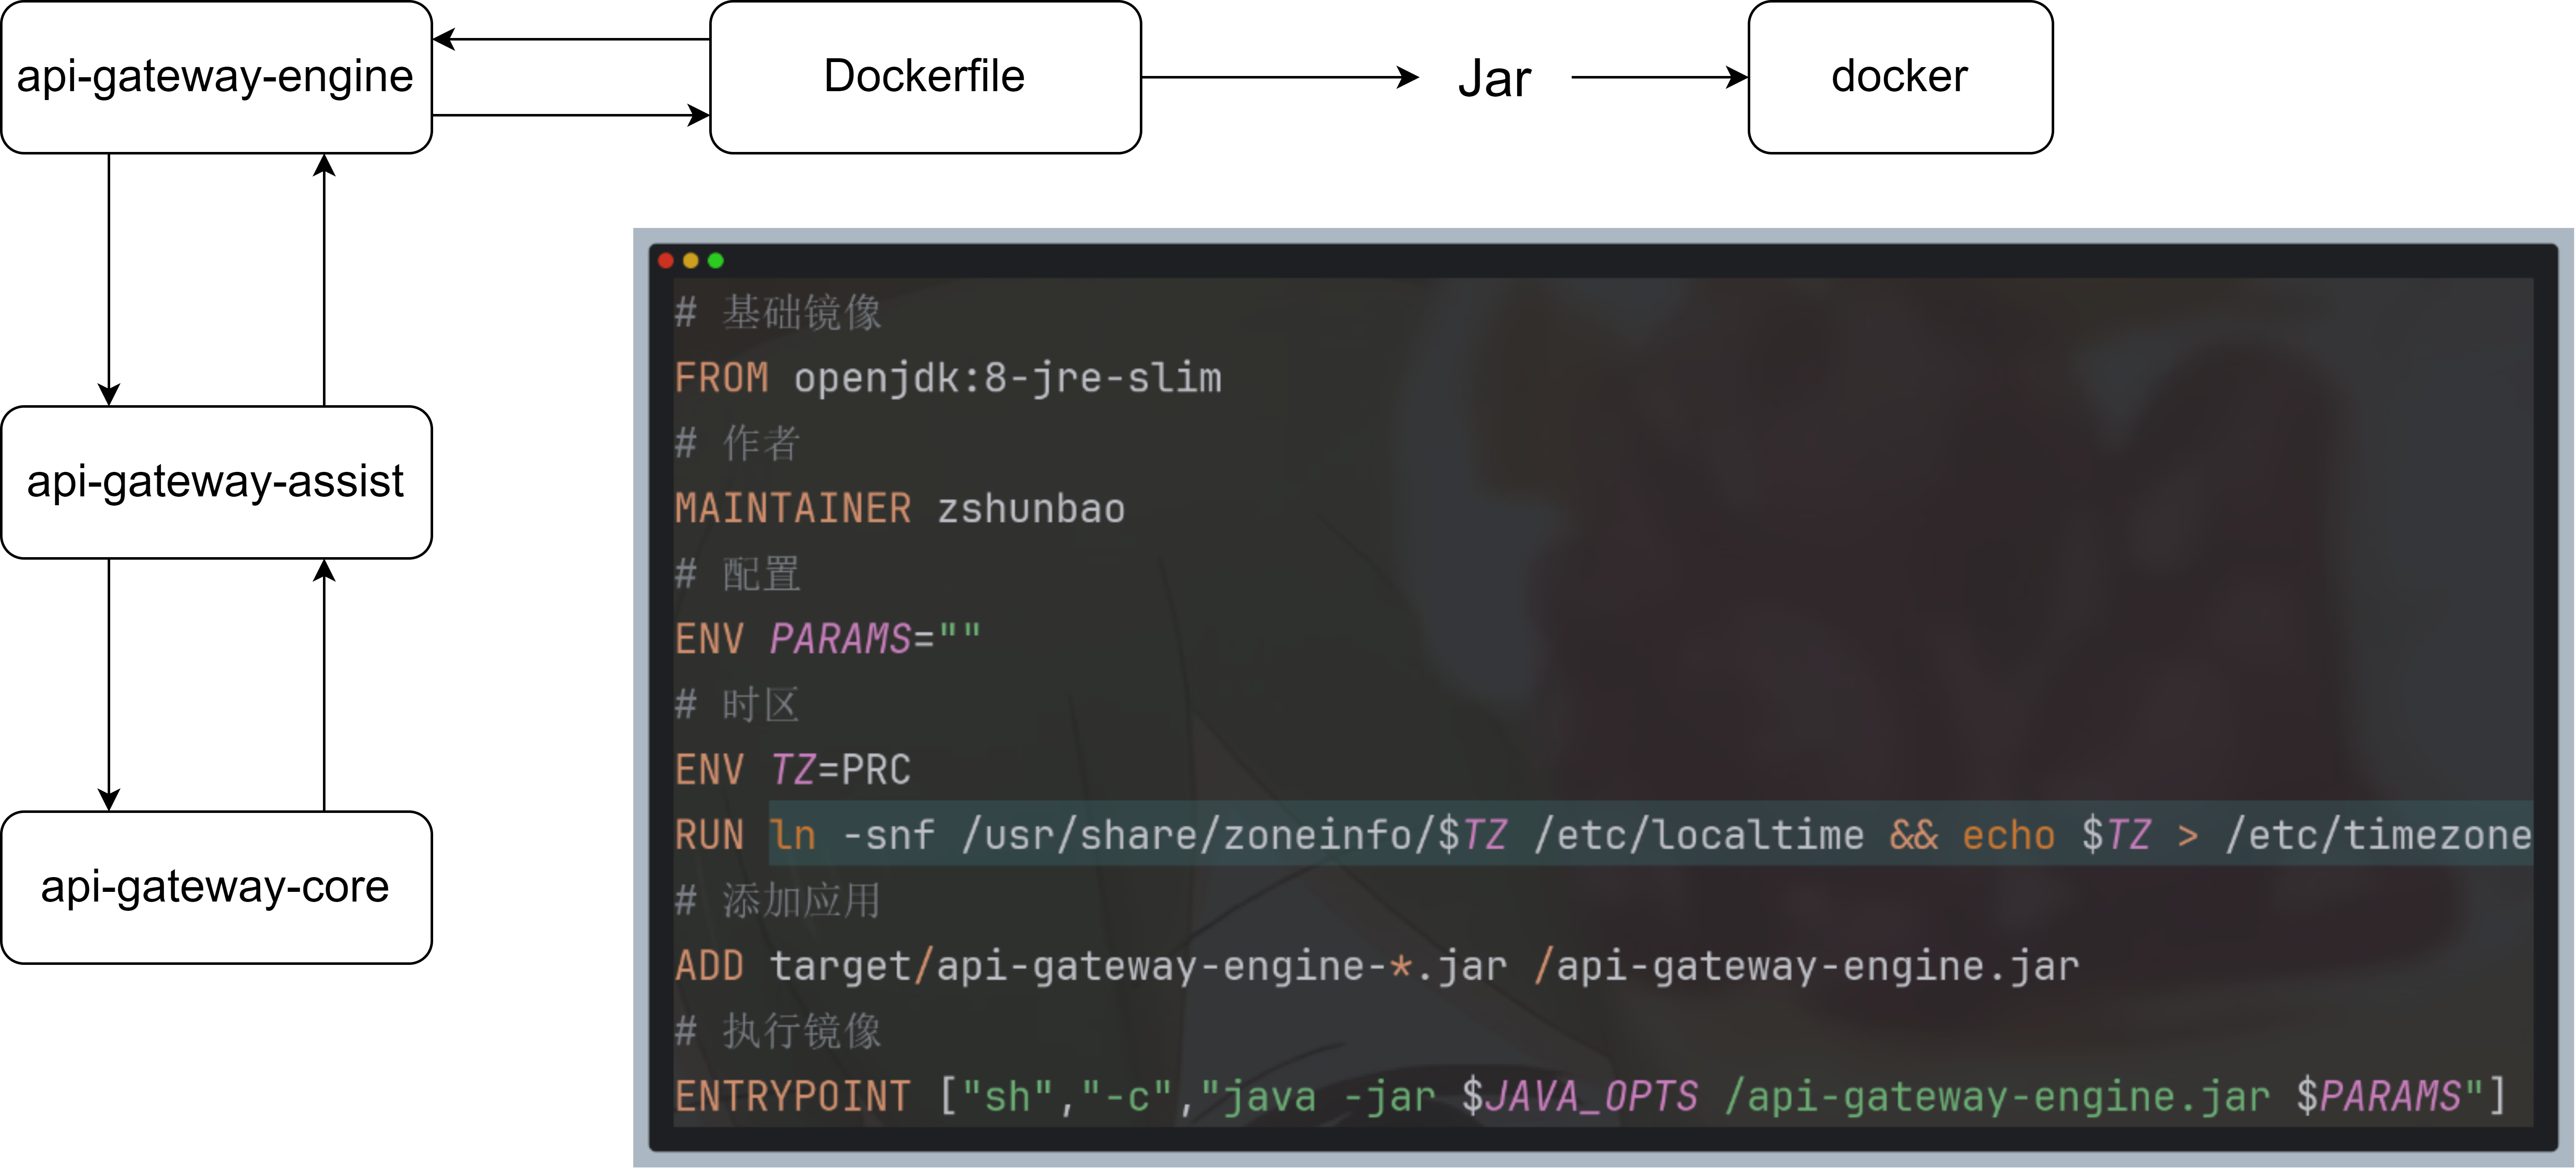
然后写出其制作docker镜像的Dockerfile,如下
 # 基础镜像
 FROM openjdk:8-jre-slim
 # 作者
 MAINTAINER zshunbao
 # 配置
 ENV PARAMS=""
 # 时区
 ENV TZ=PRC
 RUN ln -snf /usr/share/zoneinfo/$TZ /etc/localtime && echo $TZ > /etc/timezone
 # 添加应用
 ADD target/api-gateway-engine-*.jar /api-gateway-engine.jar
 # 执行镜像
ENTRYPOINT ["sh","-c","java -jar $JAVA_OPTS /api-gateway-engine.jar $PARAMS"]在有了对应的Dockerfile后,我们要有通过Dockerfile制作镜像的脚本build.sh
docker build -f ./Dockerfile -t api-gateway-engine:1.0.1 .当有了对应的镜像后,我们需要一个通过镜像创建示例的脚本start.sh
docker run -p 8004:8004 -p 7397:7397 --name api-gateway-engine -d api-gateway-engine:1.0.1接下来我们就去依次执行build.sh,start.sh来将api-gateway-engine部署到docker上面。
由于我们本地是在windows环境上,我们在本地配置了WSL,并通过Docker Desktop有了本地的docker环境,但由于是windows环境,所以我们无法用PowerShell执行上述脚本。所以我们需要进行WSL的linux环境中来执行。由于安装WSL后,我们本地的电脑相当于拥有了windows和linux的双系统,因此我们可以通过WSL的linux系统找到当前项目位置。
用MobaXterm打开本地的WSL(也可以在windows的命令行窗口键入wsl命令进入)
进入后输入
cd /mnt/windows本地项目文件位置例如
cd /mnt/f/zsbao/Code/IDE/buckstack_project/API-GateWay/api-gateway-engine/api-gateway-engine-01进入对应的目录后,先使用 chmod 命令赋予脚本执行权限,执行:
chmod +x build.sh start.sh在拥有执行权限后,先后执行
 ./build.sh
 ./start.sh
如下图
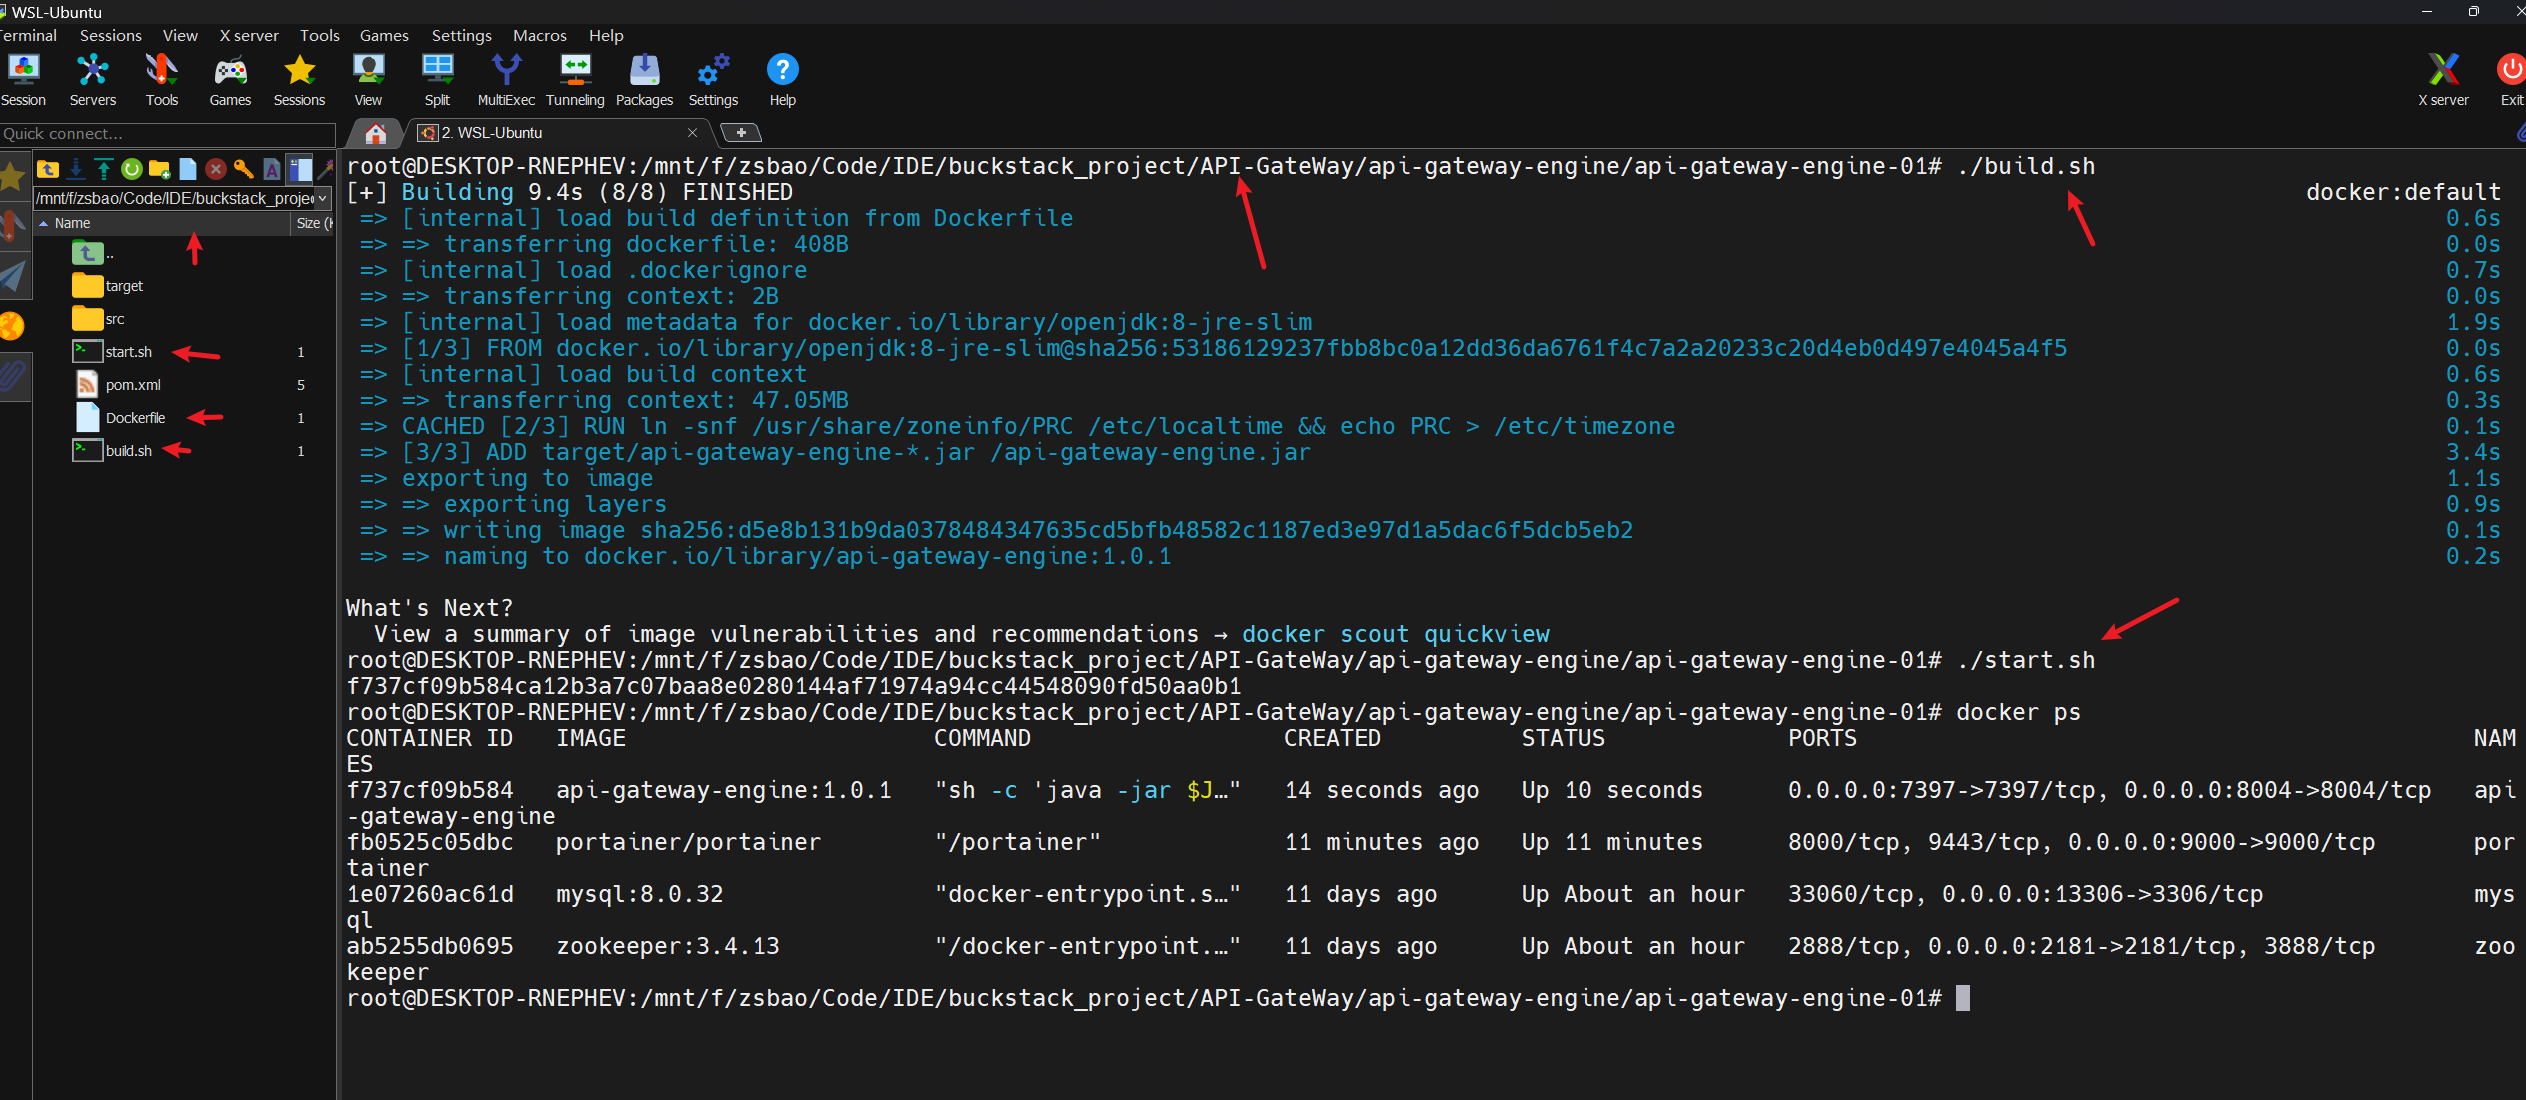
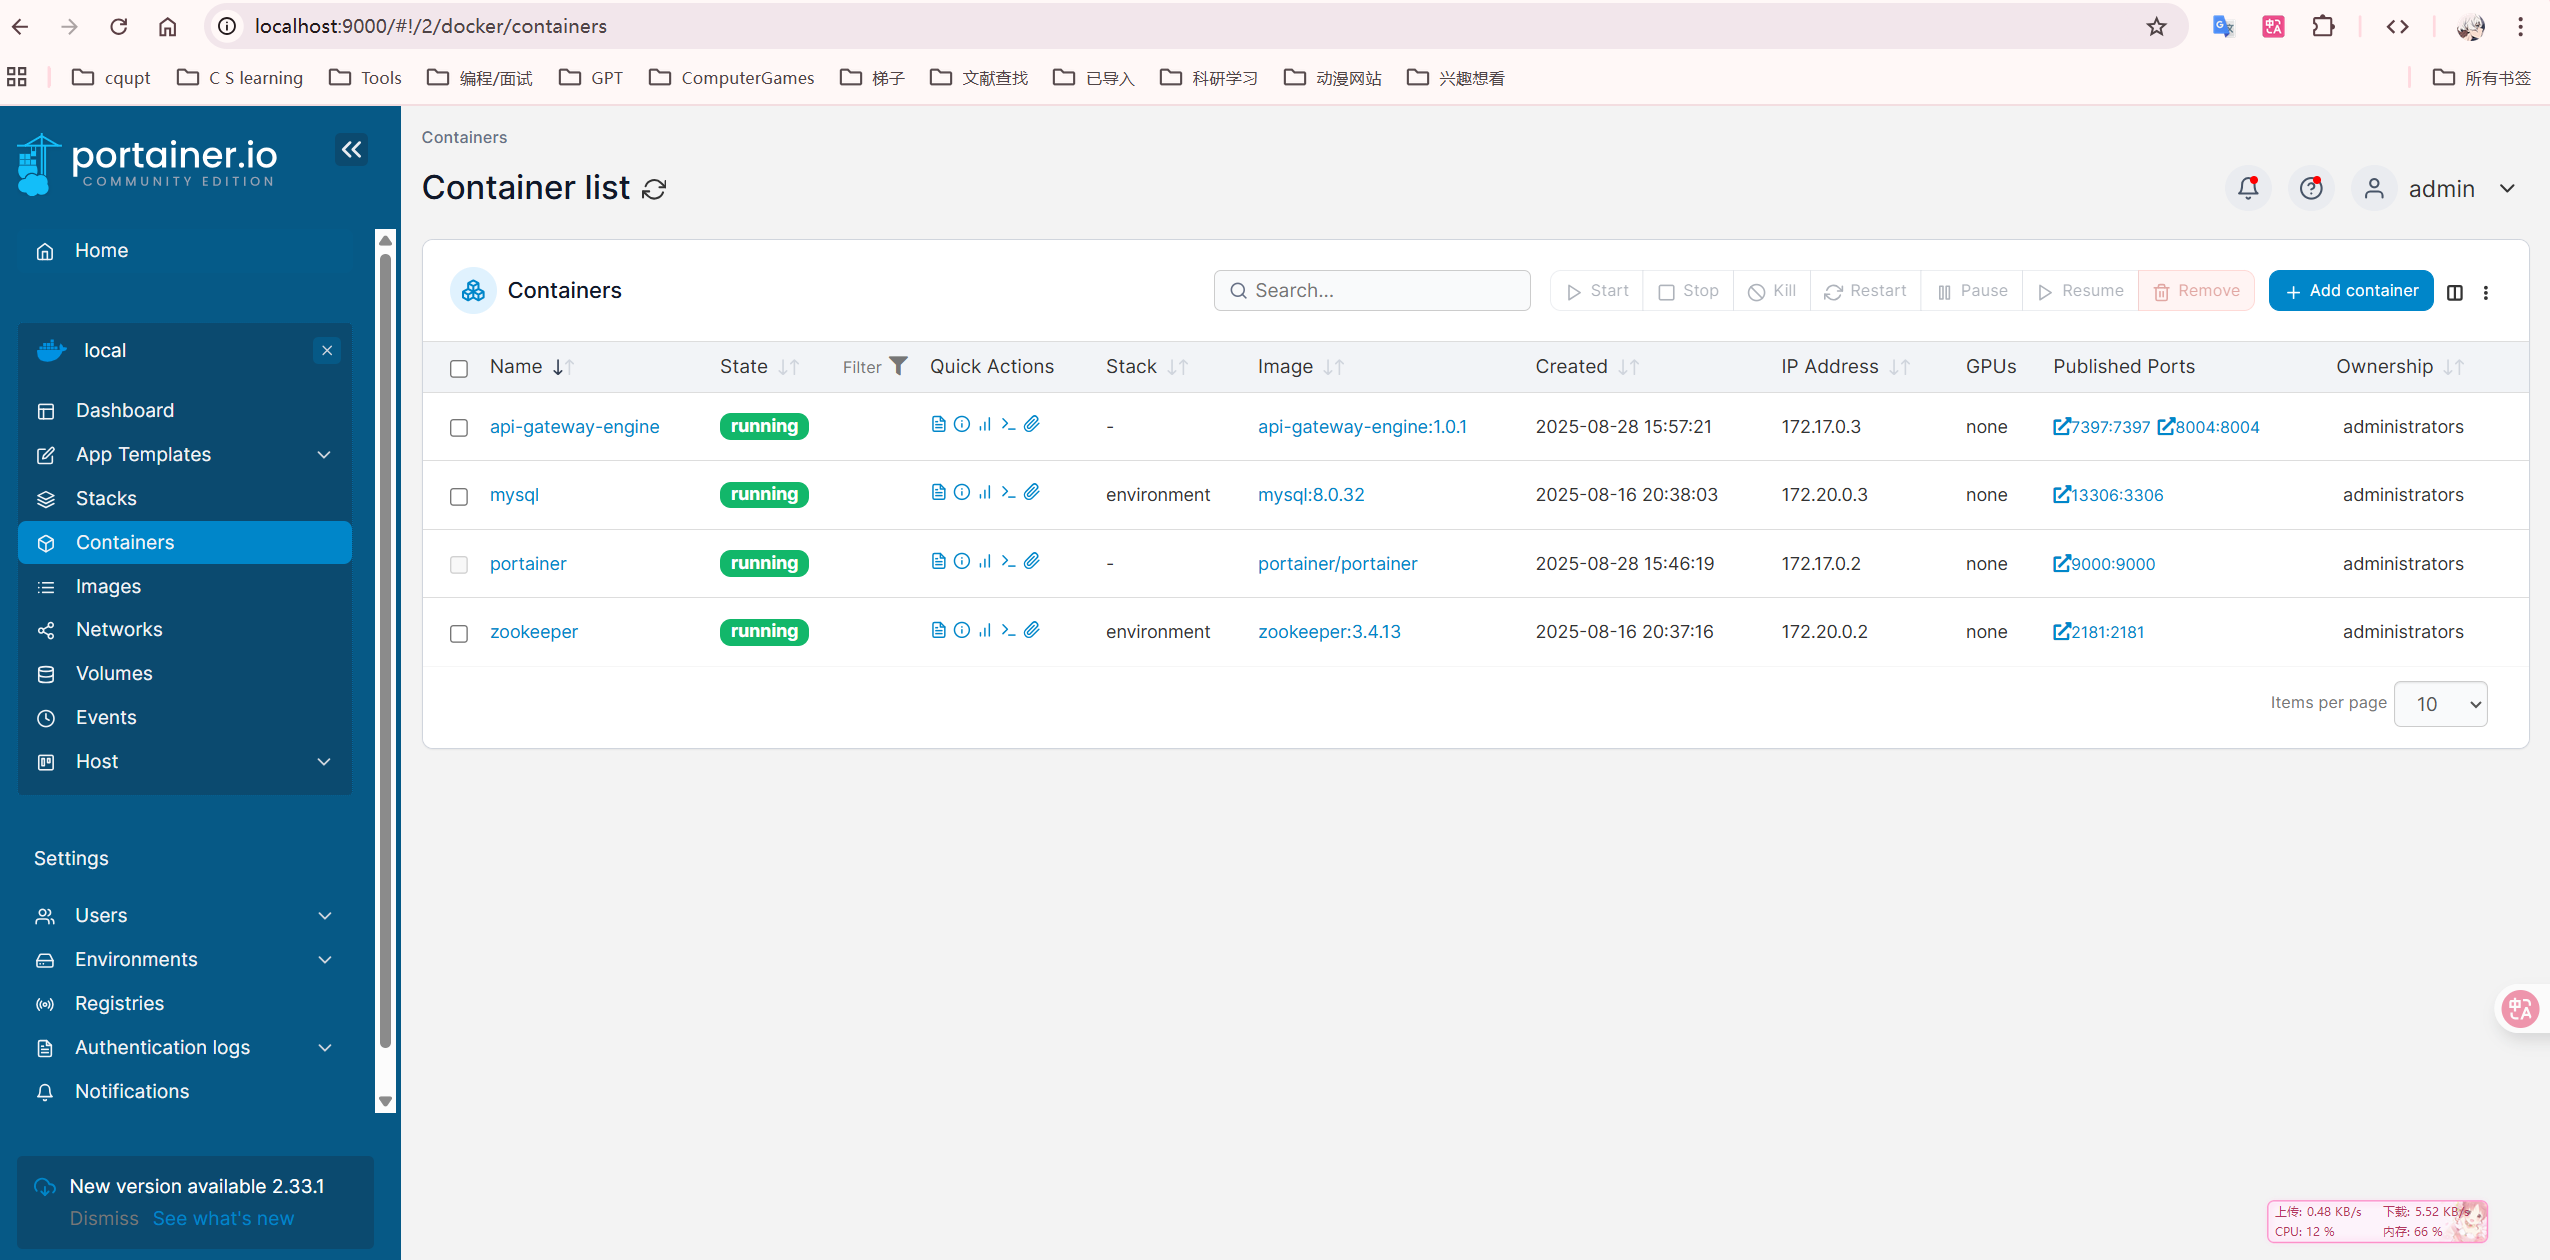
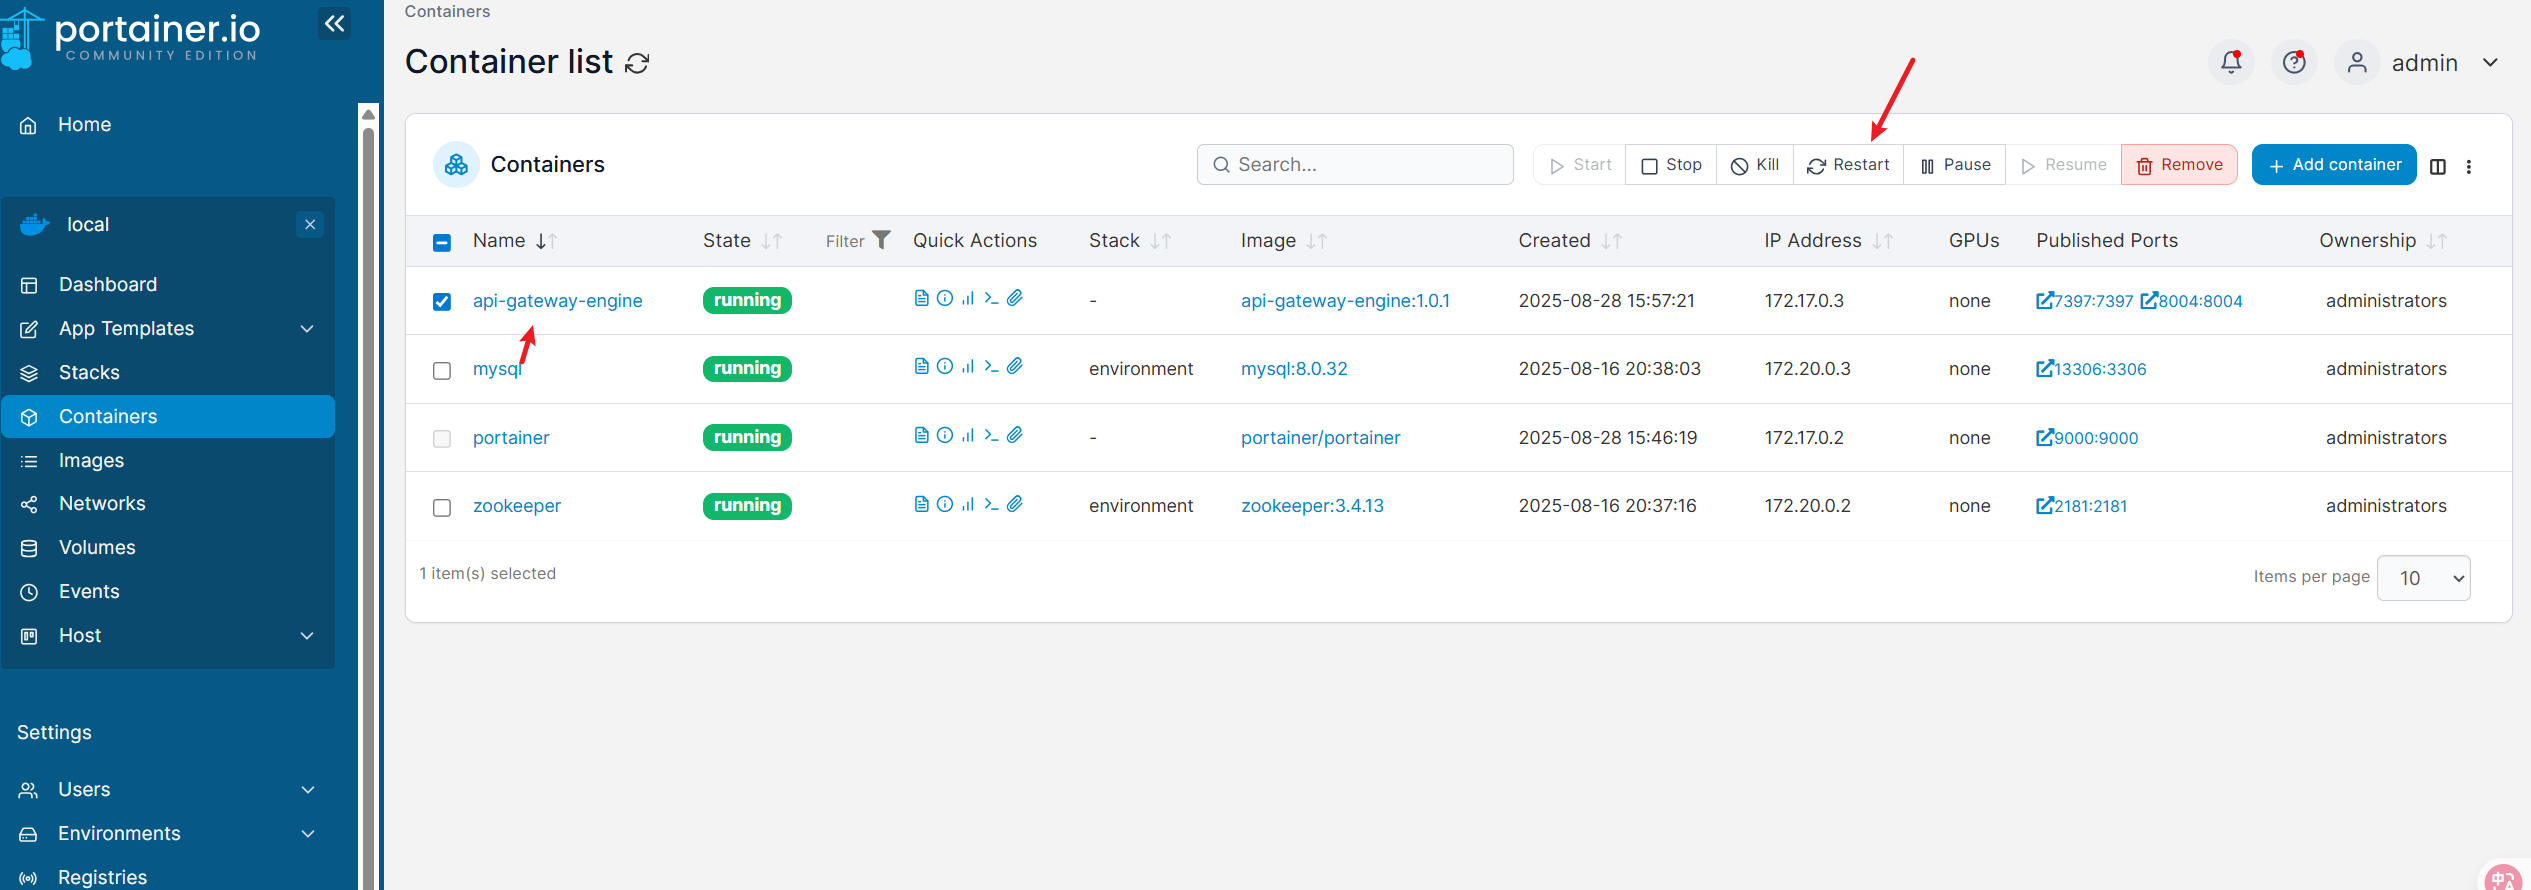
部署完成后,可在Portainer面板中查看
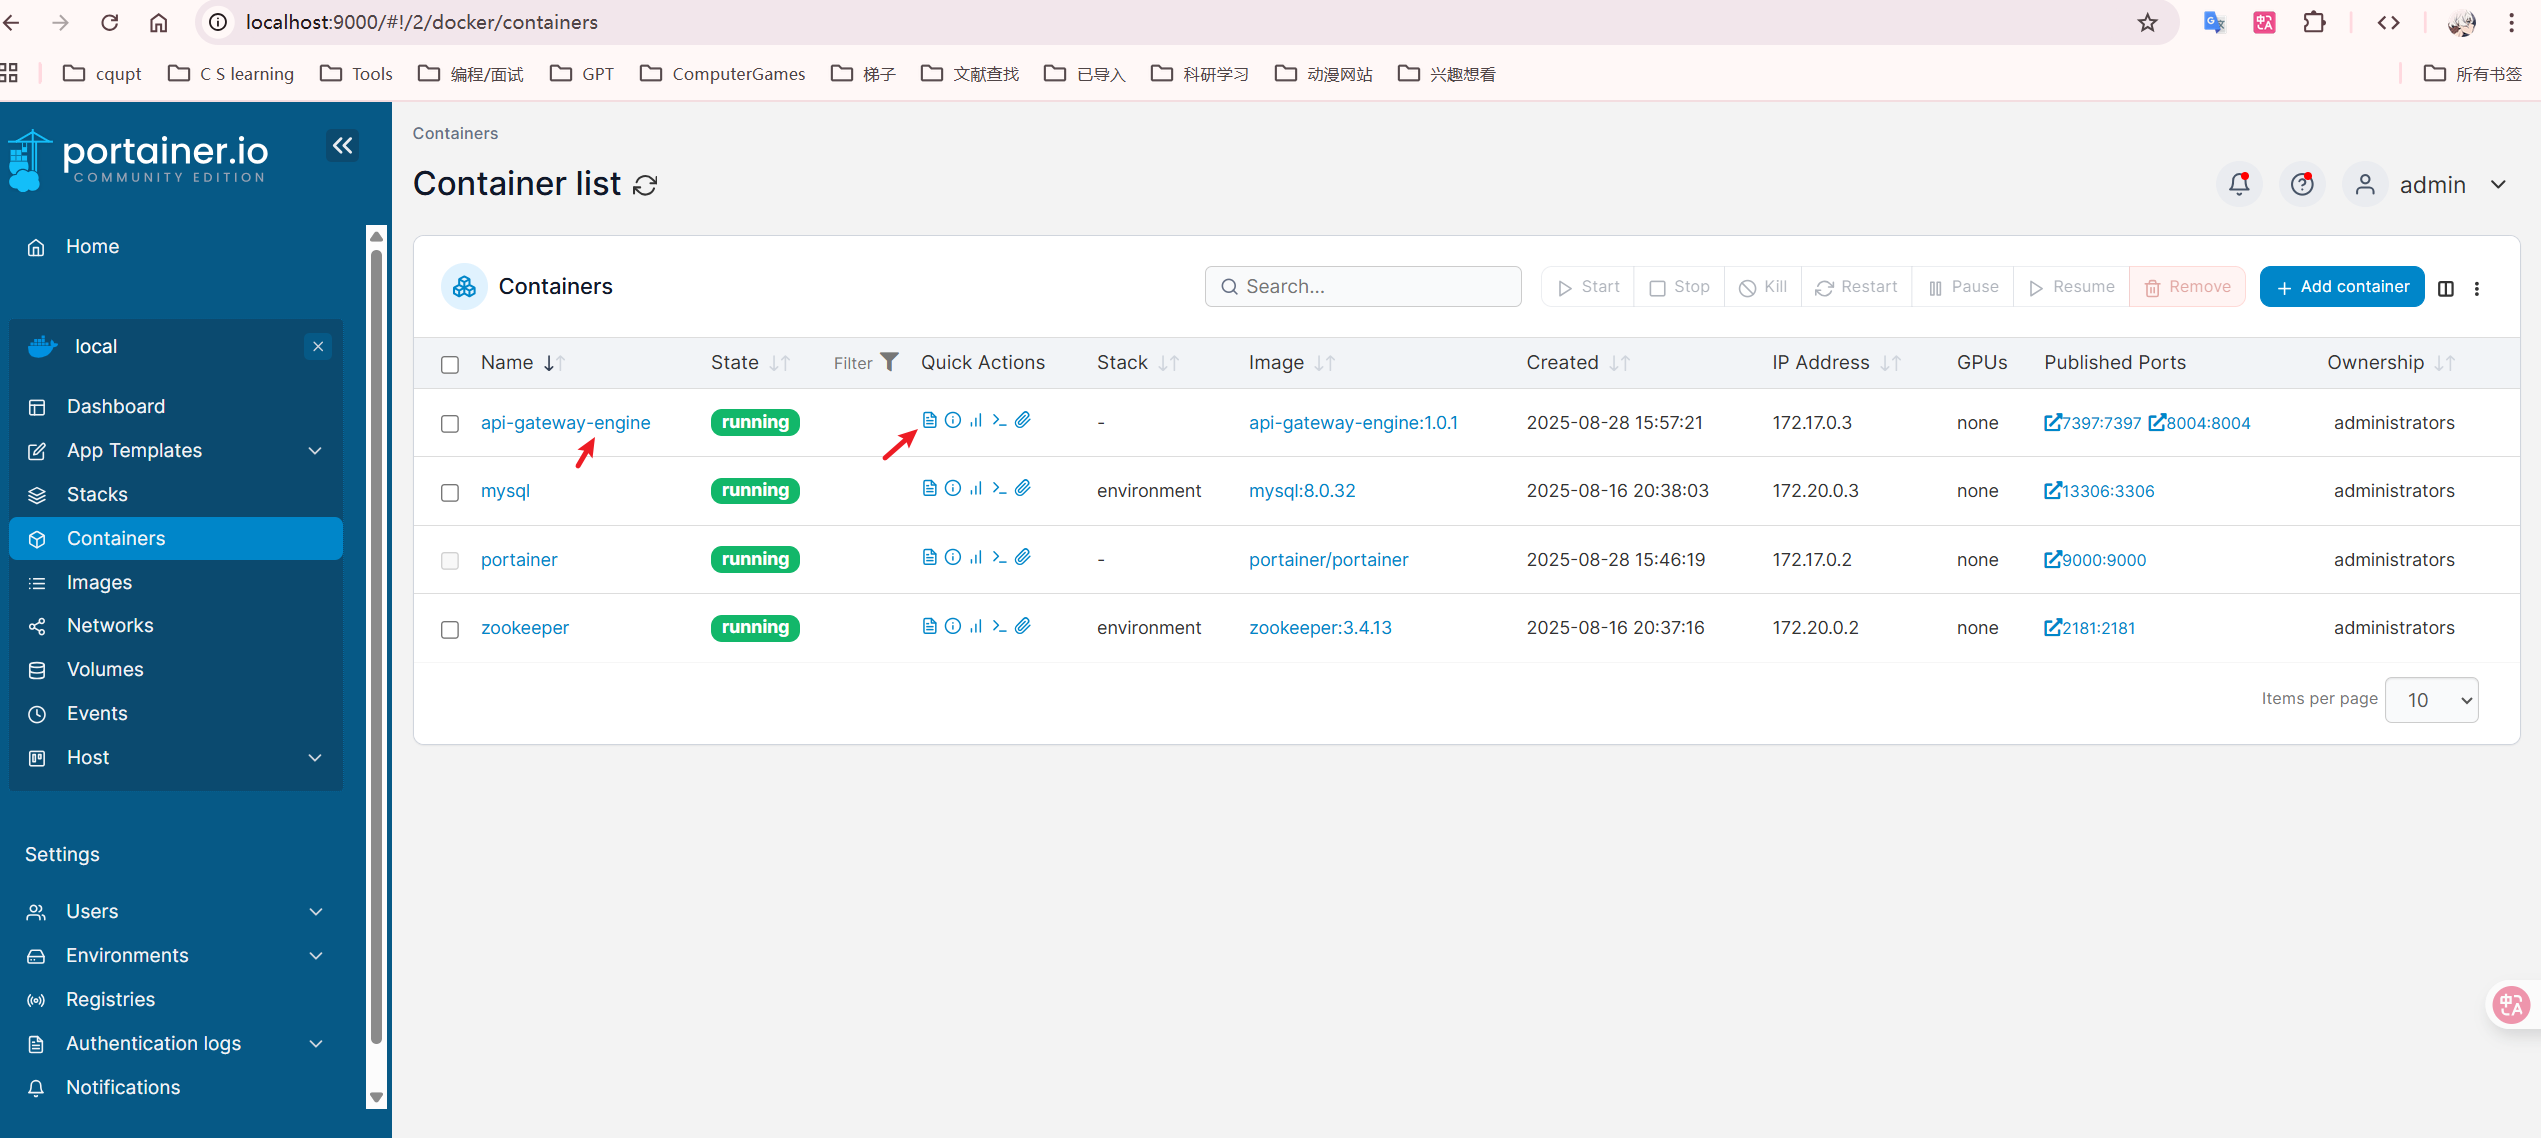
我们进入api-gateway-engine容器中查看,点击上述图片红色箭头指向的小文件似的图标,可查看对应容器日志
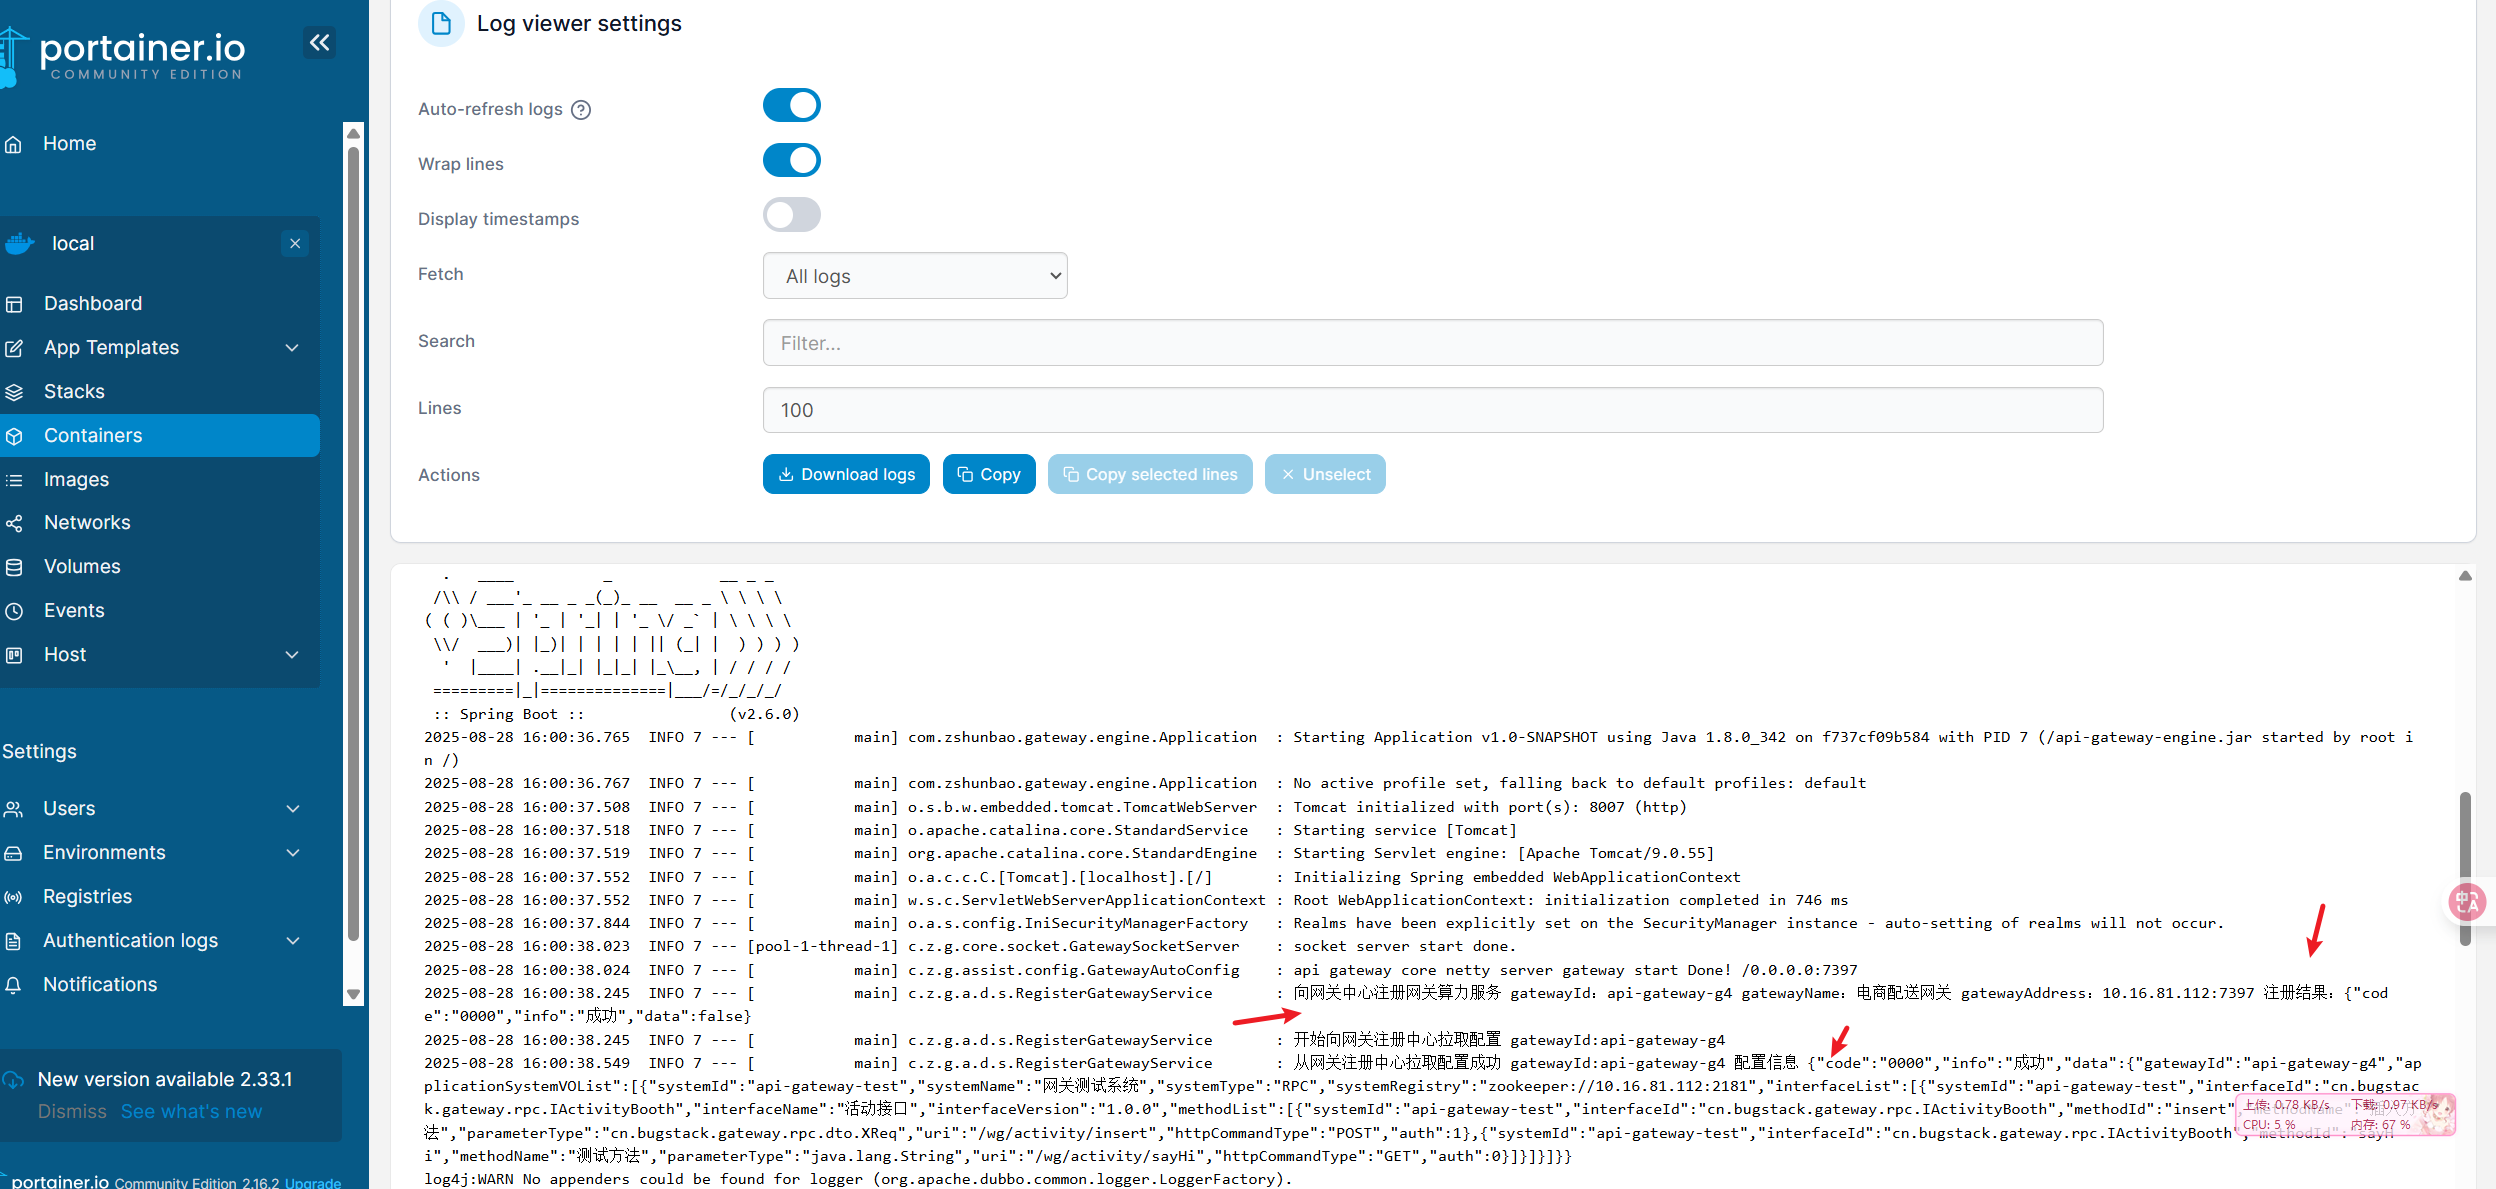
注意上述图片,由于我们在api-gateway-assist中对于注册或者拉取服务都有resultStr=HttpUtil.post(address+"/wg/admin/config/queryApplicationSystemRichInfo", paramMap, 1200);设置时间限制,所以容器在第一次部署启动可能会报超时错误,这里只需要在Portainer中重启几次容器即可(我们这里重启了3次)
如上,api-gateway-engine部署成功,并且成功向本地idea启动的网关注册中心api-gateway-center注册和拉取配置。
测试
这里的测试很简单,我们不已经启动了我们的RPC测试服务api-gateway-test嘛,我们直接打开ApiPost,进行网关功能的访问
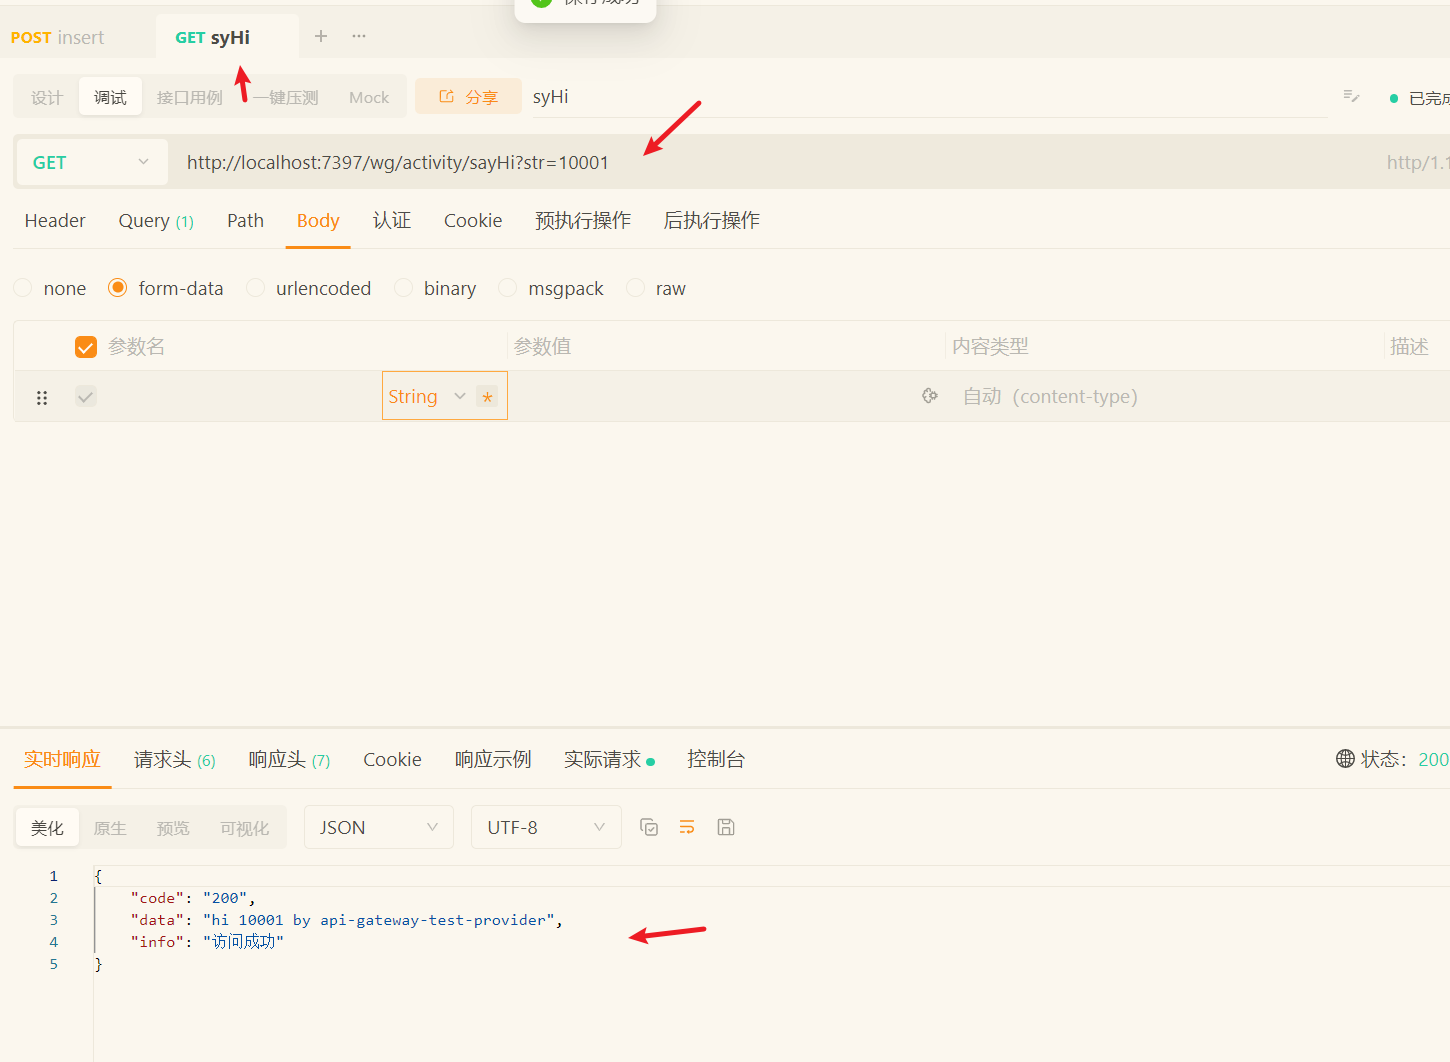
容器日志

访问insert方法,注意这个方法需要去api-gateway-core重新生成token(可能之前的过期了)
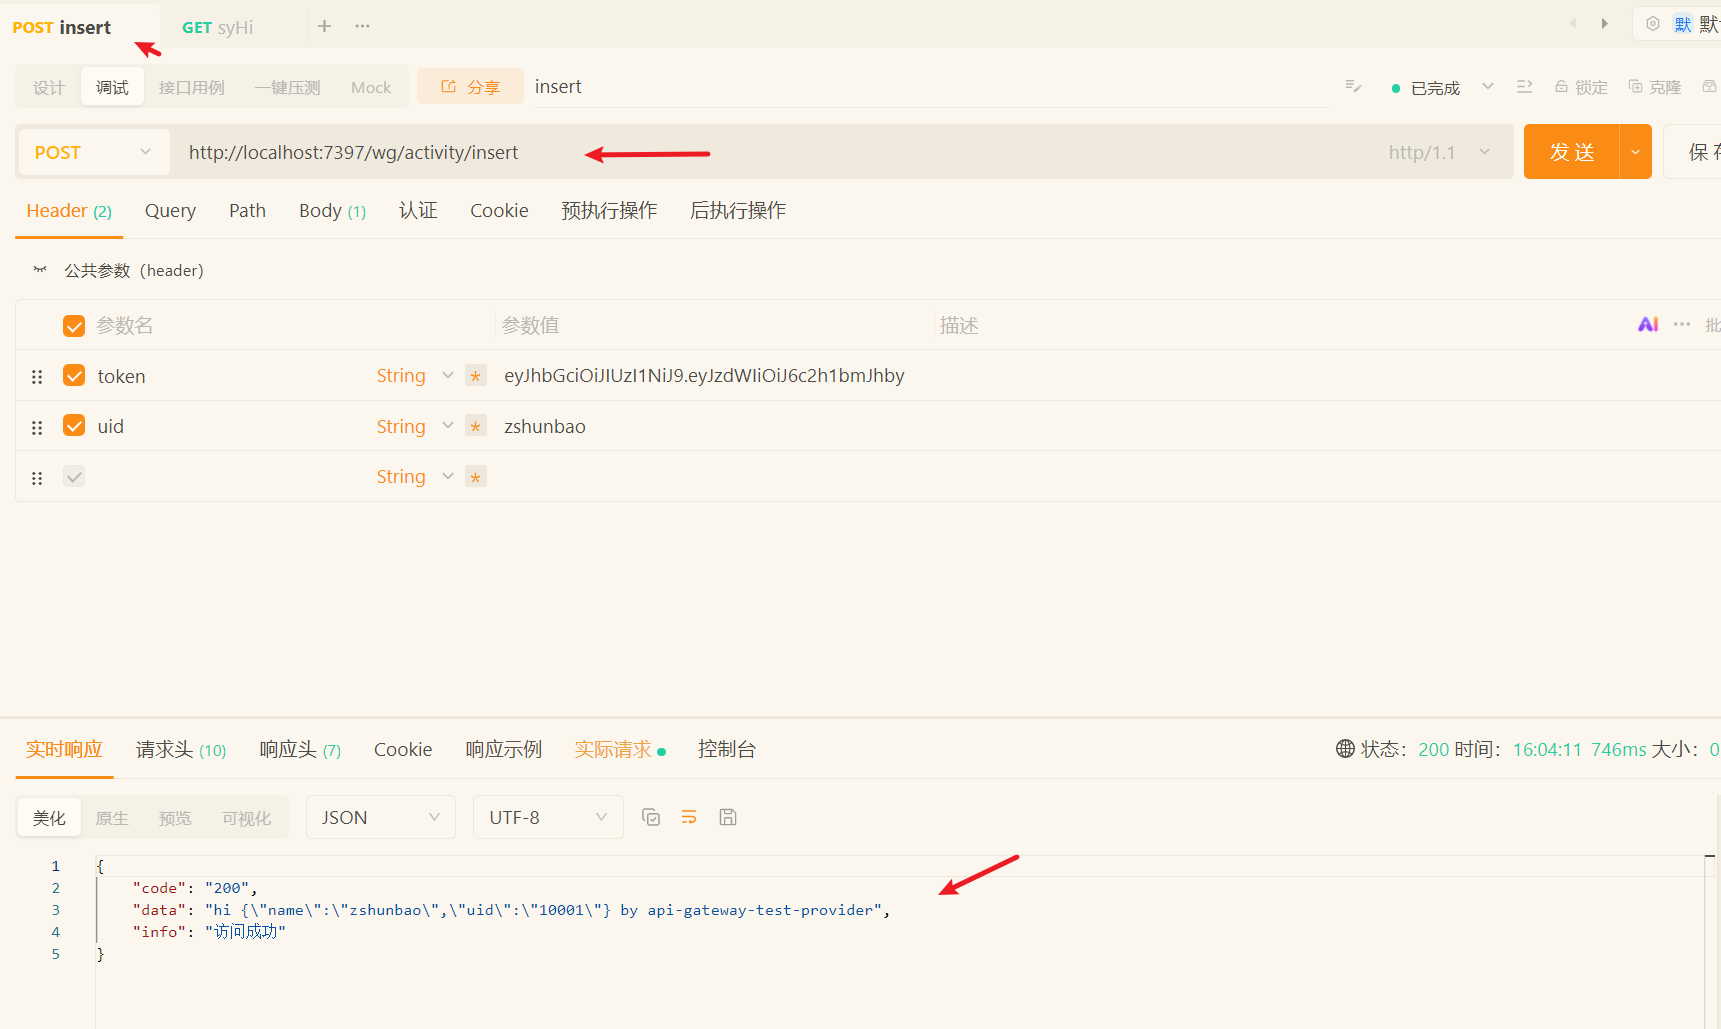
容器日志如下

如上测试成功