
业务流程
用于承载 HTTP 请求转换协议泛化调用 RPC 服务的网关算力不可能只有一组服务,而是一个网关算力集群化的设计实现。而对于这样一个诉求的实现,基本的核心模型结构就是负载的配置和轮训策略的使用。所以上一章节中,我们引入了nginx并完成了nginx的负载均衡相关的配置。
我们的场景目的是
当有新的网关算力组件注册进来后,我们希望我么可以更新对应的nginx配置,以使每次的访问网关时,网关可以通过nginx的负载配置将某一组服务打到对应的网关算力集群的一个节点上去。每次集群有新的算力节点实例(api-gateway-core)进来时,都要更新对应的nginx配置。
那么上述功能可以分为两部分,算力节点动态变更,然后根据变更更新配置
本章节我们先不考虑算里节点的问题,我们先完成nginx配置更新这块的功能,这块完成后,再来引入算力节点进行更新。实际就是将原本复杂的功能拆为了几步,我们一步一步的做
现在既然要更新nginx配置,我们该如何更新它呢?
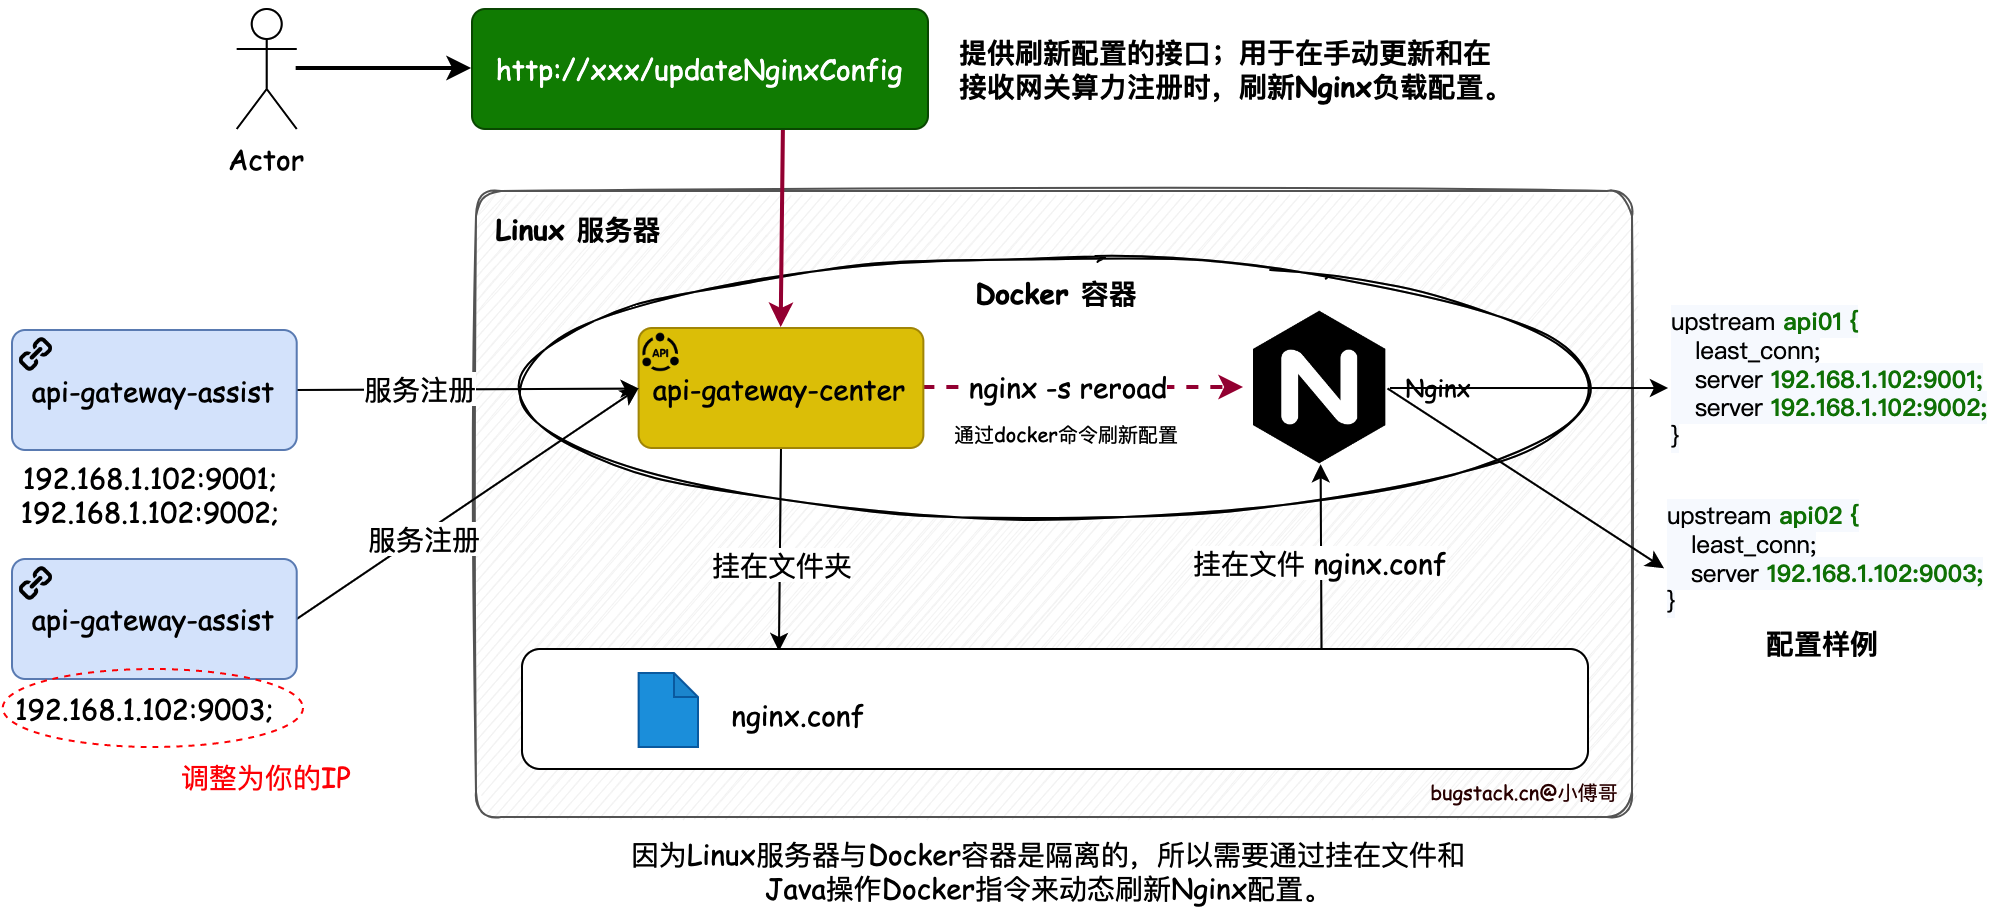
这里有一个问题当前nginx服务部署到Docker容器场景,Docker 是嵌入到 服务器内的,每个镜像实例的部署也都是隔离的,那么这个时候该怎么完成配置文件的互通和指令调用就成了本章要解决的核心问题。
一种方式是将我们更新的配置复制到nginx的对应配置文件夹中,覆盖原有的配置文件,但这其中就涉及到了各种文件路径的转换,linux系统与docker文件的切入,很麻烦
另一种就是由于我们的nginx部署到docker容器中,我们可以将nginx的配置文件与项目中的文件进行挂载,更新配置文件就是直接更新本项目的挂载文件,更新后调用对应的nginx容器执行相关的reload命令即可
那么如何通过Java程序对部署到docker上的nginx进行调用呢?
Docker 场景下,所以需要通过 Java 控制并获取 Docker 容器中 Nginx 的服务,并对其进行操作。这里还会涉及到网络的问题,否则在容器中服务1不能调用服务2。
如下图
业务实现
整体流程
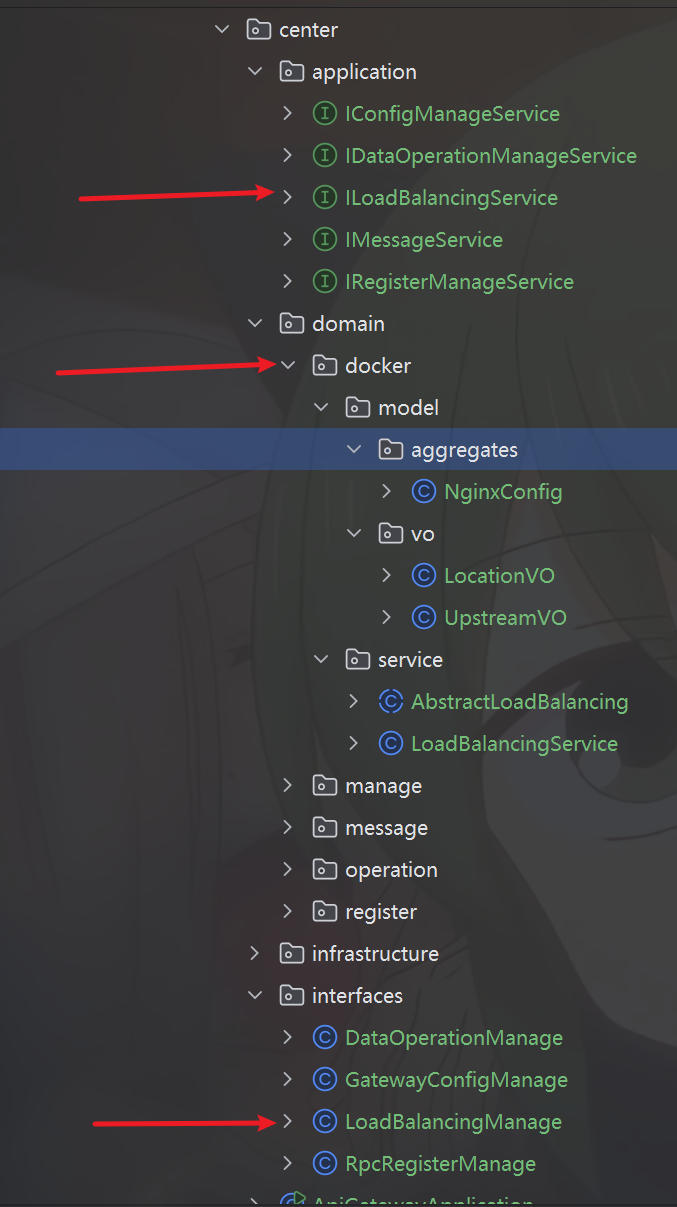
本章节得的项目结构如下
我们把在这章节的功能内容可以分为2步来做
配置nginx配置文件内容
调用docker中的nginx执行刷新命令,刷新nginx配置文件
这里我们先定义好服务最基本的需要的物料
由于是DDD项目,我们先定义总结领域接口
package com.zshunbao.gateway.center.application;
import com.zshunbao.gateway.center.domain.docker.model.aggregates.NginxConfig;
/**
* @program: api-gateway-center
* @ClassName ILoadBalancingService
* @description: 负载均衡配置服务
* @author: zs宝
* @create: 2025-09-09 14:41
* @Version 1.0
**/
public interface ILoadBalancingService {
void updateNginxConfig(NginxConfig nginxConfig) throws Exception;
}
随后定义对应的充血模型
这里我们思考下在上一章节我们配置nginx.conf文件内容中,对于新的网关算力注册进去后,对于算力集群,让nginx进行负载均衡其实只有配置文件中的两个内容是需要更新的,分别是nginx.conf的关于负载均衡的配置upstream和反向代理的location
# 设定负载均衡的服务器列表
upstream api01 {
least_conn;
server host.docker.internal:9001;
server host.docker.internal:9002;
} # 反向代理的路径(upstream绑定),location 后面设置映射的路径
location / {
proxy_pass http://host.docker.internal:9001;
}那么由此充血模型中的VO对象就出来了
UpstreamVO.java
package com.zshunbao.gateway.center.domain.docker.model.vo;
import java.util.List;
/**
* @program: api-gateway-center
* @ClassName UpstreamVO
* @description: nginx 有关其中负载均衡的服务器列表的配置vo
* @author: zs宝
* @create: 2025-09-09 14:46
* @Version 1.0
**/
public class UpstreamVO {
/** 名称 */
private String name;
/** 复杂策略;least_conn;、 ip_hash; */
private String strategy;
/** 服务列表;192.168.1.102:9001; */
private List<String> servers;
public UpstreamVO(String name, String strategy, List<String> servers) {
this.name = name;
this.strategy = strategy;
this.servers = servers;
}
public String getName() {
return name;
}
public void setName(String name) {
this.name = name;
}
public String getStrategy() {
return strategy;
}
public void setStrategy(String strategy) {
this.strategy = strategy;
}
public List<String> getServers() {
return servers;
}
public void setServers(List<String> servers) {
this.servers = servers;
}
}
以及LocationVO.java
package com.zshunbao.gateway.center.domain.docker.model.vo;
/**
* @program: api-gateway-center
* @ClassName LocationVO
* @description: nginx反向代理配置的vo
* @author: zs宝
* @create: 2025-09-09 14:44
* @Version 1.0
**/
public class LocationVO {
private String name;
private String proxy_pass;
public LocationVO(String name, String proxyPass) {
this.name = name;
proxy_pass = proxyPass;
}
public String getName() {
return name;
}
public void setName(String name) {
this.name = name;
}
public String getProxy_pass() {
return proxy_pass;
}
public void setProxy_pass(String proxy_pass) {
this.proxy_pass = proxy_pass;
}
}
最后还需要一个总的关于nginx配置的聚合对象NginxConfig.java
package com.zshunbao.gateway.center.domain.docker.model.aggregates;
import com.zshunbao.gateway.center.domain.docker.model.vo.LocationVO;
import com.zshunbao.gateway.center.domain.docker.model.vo.UpstreamVO;
import java.util.List;
/**
* @program: api-gateway-center
* @ClassName NginxConfig
* @description: nginx配置config聚合类
* @author: zs宝
* @create: 2025-09-09 14:49
* @Version 1.0
**/
public class NginxConfig {
/** 应用名称 **/
private String applicationName;
/** nginx容器名称 **/
private String nginxName;
/** 本地配置文件路径 **/
private String localNginxPath;
/** 远程nginx配置路径 **/
private String remoteNginxPath;
/** 反向代理列表 */
private List<LocationVO> locationList;
/** 负载均衡列表 */
private List<UpstreamVO> upstreamList;
public NginxConfig(String applicationName, String nginxName, String localNginxPath, String remoteNginxPath, List<LocationVO> locationList, List<UpstreamVO> upstreamList) {
this.applicationName = applicationName;
this.nginxName = nginxName;
this.localNginxPath = localNginxPath;
this.remoteNginxPath = remoteNginxPath;
this.locationList = locationList;
this.upstreamList = upstreamList;
}
public NginxConfig(List<UpstreamVO> upstreamList, List<LocationVO> locationList) {
this.applicationName = "api-gateway-center";
this.nginxName = "Nginx";
//默认位置
this.localNginxPath = "F:\\zsbao\\Code\\IDE\\buckstack_project\\API-GateWay\\api-gateway-center\\docs\\dev-ops\\environment\\nginx\\conf\\nginx.conf";
this.remoteNginxPath = "/etc/nginx/";
this.upstreamList = upstreamList;
this.locationList = locationList;
}
public String getApplicationName() {
return applicationName;
}
public void setApplicationName(String applicationName) {
this.applicationName = applicationName;
}
public String getNginxName() {
return nginxName;
}
public void setNginxName(String nginxName) {
this.nginxName = nginxName;
}
public String getLocalNginxPath() {
return localNginxPath;
}
public void setLocalNginxPath(String localNginxPath) {
this.localNginxPath = localNginxPath;
}
public String getRemoteNginxPath() {
return remoteNginxPath;
}
public void setRemoteNginxPath(String remoteNginxPath) {
this.remoteNginxPath = remoteNginxPath;
}
public List<LocationVO> getLocationList() {
return locationList;
}
public void setLocationList(List<LocationVO> locationList) {
this.locationList = locationList;
}
public List<UpstreamVO> getUpstreamList() {
return upstreamList;
}
public void setUpstreamList(List<UpstreamVO> upstreamList) {
this.upstreamList = upstreamList;
}
}
由于当前功能的整体流程是确定的,这里我们使用模版设计模式来规范整体流程
AbstractLoadBalancing.java
package com.zshunbao.gateway.center.domain.docker.service;
import com.zshunbao.gateway.center.application.ILoadBalancingService;
import com.zshunbao.gateway.center.domain.docker.model.aggregates.NginxConfig;
import org.slf4j.Logger;
import org.slf4j.LoggerFactory;
import java.io.IOException;
/**
* @program: api-gateway-center
* @ClassName AbstractLoadBalancing
* @description: nginx负载均衡抽象类
* @author: zs宝
* @create: 2025-09-09 15:00
* @Version 1.0
**/
public abstract class AbstractLoadBalancing implements ILoadBalancingService {
private Logger logger = LoggerFactory.getLogger(AbstractLoadBalancing.class);
/**
* 模版设计模式定义好执行流程,具体实现交给子类去做
* @param nginxConfig
* @throws Exception
*/
@Override
public void updateNginxConfig(NginxConfig nginxConfig) throws Exception {
//1、创建nginx配置文件
String containerFilePath=createNginxConfigFile(nginxConfig);
logger.info("步骤1:创建 Nginx 配置文件 containerFilePath:{}", containerFilePath);
//2、刷新nginx配置文件
refreshNginxConfig(nginxConfig.getNginxName());
logger.info("步骤2:刷新 Nginx 配置文件 Done!");
}
protected abstract String createNginxConfigFile(NginxConfig nginxConfig) throws IOException;
protected abstract void refreshNginxConfig(String nginxName) throws InterruptedException, IOException;
}
Nginx配置文件内容更改
现在我们做第一步的配置nginx配置文件内容,注意其中创建的文件地址,要区api-gateway-center分是在本地运行还是服务器的docker容器上运行。
@Override
protected String createNginxConfigFile(NginxConfig nginxConfig) throws IOException {
//文件内容创建
String nginxConfigContentStr=buildNginxConfig(nginxConfig.getUpstreamList(),nginxConfig.getLocationList());
//创建文件,docker容器内部使用时要修改文件路径
//File file = new File("/nginx/conf/nginx.conf");
// 现在用的是windows本地
File file = new File("F:\\zsbao\\Code\\IDE\\buckstack_project\\API-GateWay\\api-gateway-center\\docs\\dev-ops\\environment\\nginx\\conf\\nginx.conf");
if(!file.exists()){
boolean success = file.createNewFile();
if(success){
logger.info("nginx.conf file created successfully.");
}else {
logger.info("nginx.conf file already exists.");
}
}
//向文件中写入内容
FileWriter writer = new FileWriter(file);
writer.write(nginxConfigContentStr);
writer.close();
//返回结果
return file.getAbsolutePath();
}
private String buildNginxConfig(List<UpstreamVO> upstreamList, List<LocationVO> locationList) {
//nginx.conf基础模版中的内容,在其中流了给负载均衡和方向代理的占位符,
// upstream_config_placeholder,location_config_placeholder
String config = "\n" +
"user nginx;\n" +
"worker_processes auto;\n" +
"\n" +
"error_log /var/log/nginx/error.log notice;\n" +
"pid /var/run/nginx.pid;\n" +
"\n" +
"\n" +
"events {\n" +
" worker_connections 1024;\n" +
"}\n" +
"\n" +
"\n" +
"http {\n" +
" include /etc/nginx/mime.types;\n" +
" default_type application/octet-stream;\n" +
"\n" +
" log_format main '$remote_addr - $remote_user [$time_local] \"$request\" '\n" +
" '$status $body_bytes_sent \"$http_referer\" '\n" +
" '\"$http_user_agent\" \"$http_x_forwarded_for\"';\n" +
"\n" +
" access_log /var/log/nginx/access.log main;\n" +
"\n" +
" sendfile on;\n" +
" #tcp_nopush on;\n" +
"\n" +
" keepalive_timeout 65;\n" +
"\n" +
" #gzip on;\n" +
"\n" +
" #include /etc/nginx/conf.d/*.conf;\n" +
"\n" +
" # 设定负载均衡的服务器列表 命令:docker exec Nginx nginx -s reload\n" +
"upstream_config_placeholder" +
"\n" +
" # HTTP服务器\n" +
" server {\n" +
" # 监听80端口,用于HTTP协议\n" +
" listen 80;\n" +
"\n" +
" # 定义使用IP/域名访问\n" +
" server_name "+default_nginx_server_name+";\n" +
"\n" +
" # 首页\n" +
" index index.html;\n" +
"\n" +
" # 反向代理的路径(upstream绑定),location 后面设置映射的路径\n" +
" # location / {\n" +
" # proxy_pass http://192.168.1.102:9001;\n" +
" # }\n" +
"\n" +
"location_config_placeholder" +
" }\n" +
"}\n";
//接下来分别将负载均衡和反向代理的配置组装进去
//有关负载均衡的
StringBuilder upstreamStr=new StringBuilder();
for(UpstreamVO upstreamVO:upstreamList){
upstreamStr.append("\t").append("upstream").append(" ").append(upstreamVO.getName()).append("{\r\n");
upstreamStr.append("\t").append("\t").append(upstreamVO.getStrategy()).append("\r\n").append("\r\n");
for(String server: upstreamVO.getServers()){
upstreamStr.append("\t").append("\t").append("server").append(" ").append(server).append("\r\n");
}
upstreamStr.append("\t").append("}").append("\r\n").append("\r\n");
}
//有关反向代理的
StringBuilder locationStr = new StringBuilder();
for (LocationVO location : locationList) {
// location /api01/
locationStr.append("\t").append("\t").append("location").append(" ").append(location.getName()).append(" {\r\n");
// rewrite ^/api01/(.*)$ /$1 break; 设置重写URL,在代理后去掉根路径 api01 此字段只是配合路由,不做处理
//locationStr.append("\t").append("\t").append("\t").append("rewrite ^").append(location.getName()).append("(.*)$ /$1 break;").append("\r\n");
// proxy_pass http://api01;
locationStr.append("\t").append("\t").append("\t").append("proxy_pass").append(" ").append(location.getProxy_pass()).append("\r\n");
locationStr.append("\t").append("\t").append("}").append("\r\n").append("\r\n");
}
//将配置组装进去,就是将设定好的占位符替换掉
config=config.replace("upstream_config_placeholder",upstreamStr.toString());
config=config.replace("location_config_placeholder",locationStr.toString());
return config;
}这一块就是对于我们更新的nginx配置文件内容的代码,随后我们要做的就是调用docker中的nginx容器执行刷新命令
nginx容器刷新
代码如下
注意其中的调用有关docker守护进程的地址,
如果是windows安装的docker desktop,需要进入docker desktop的设置中使docker的守护进程对外暴露出来,且守护地址为"tcp://localhost:2375"
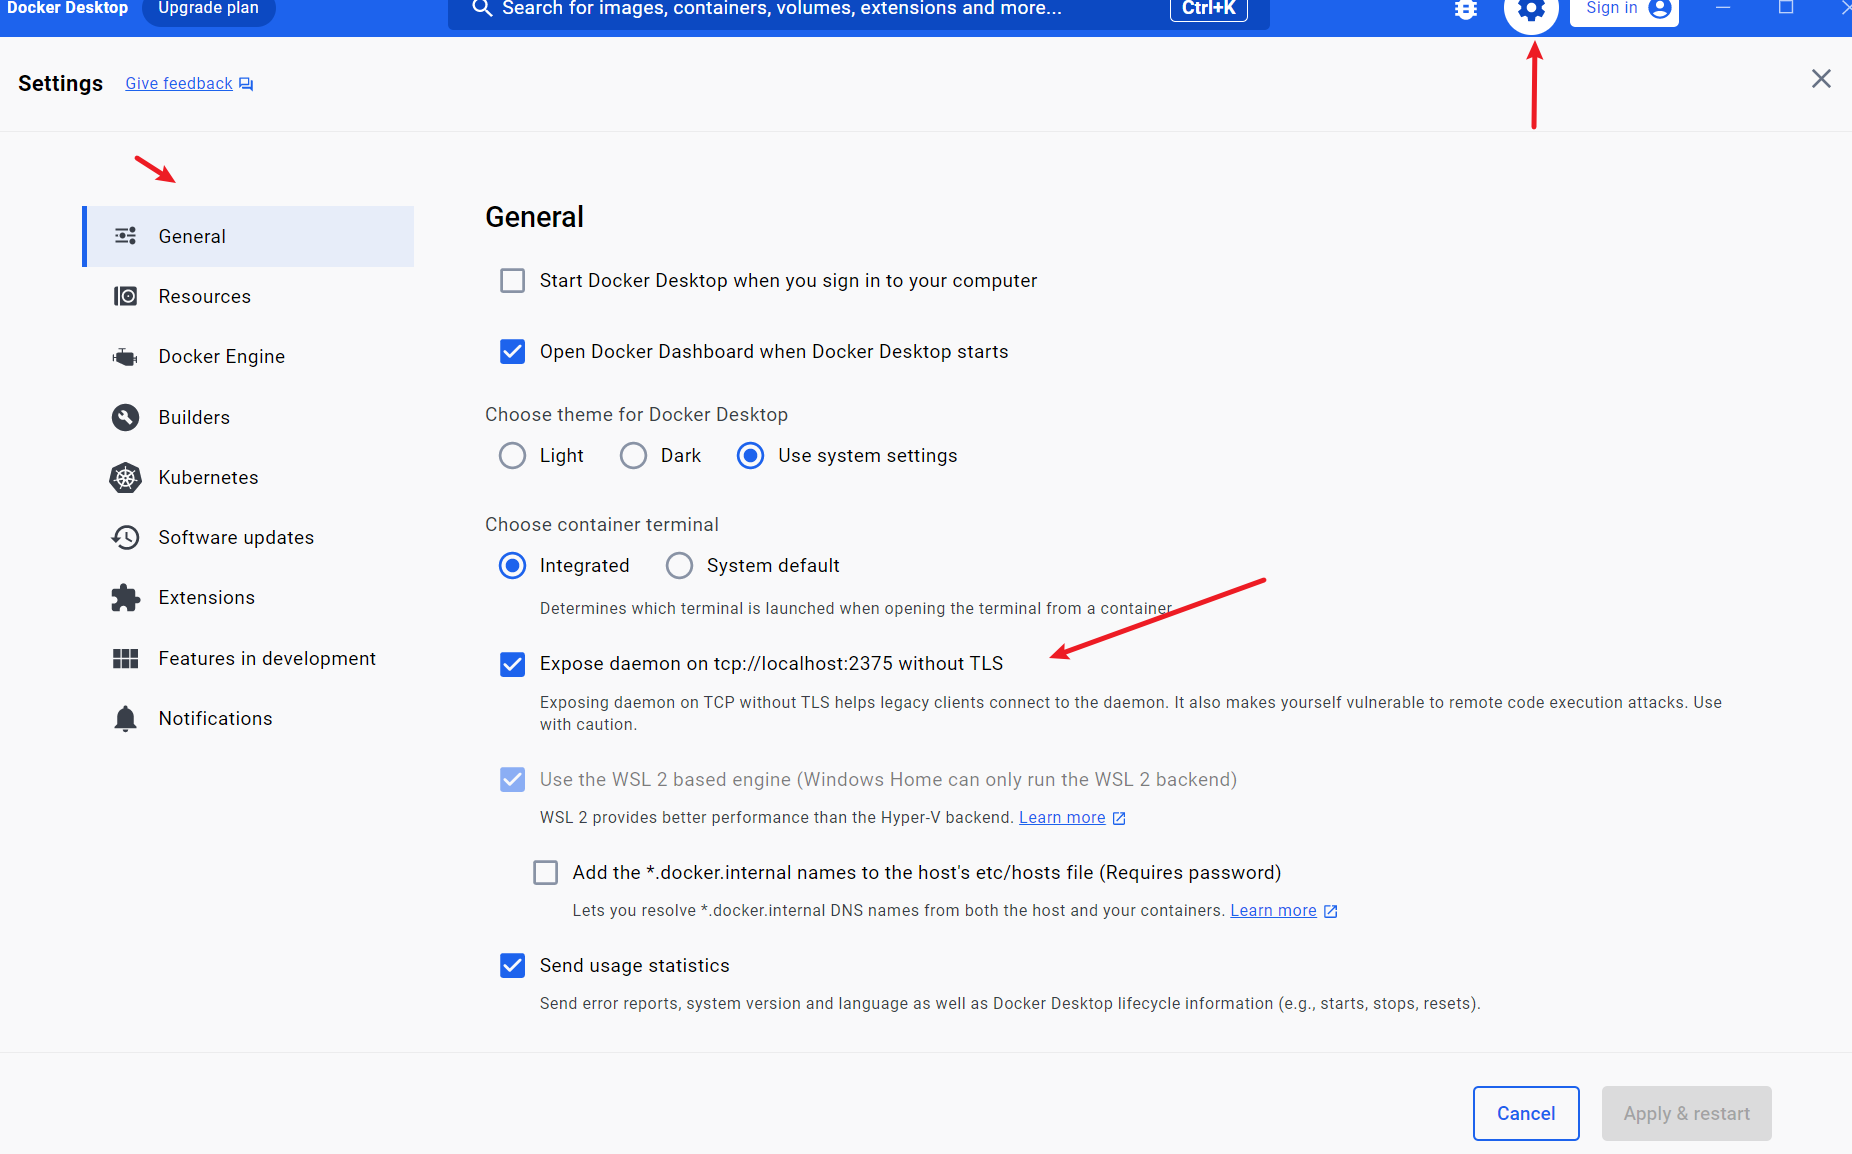
如果是linux或者MAC,则地址为"unix:///var/run/docker.sock"
代码如下
@Override
protected void refreshNginxConfig(String nginxName) throws InterruptedException, IOException {
//刷新nginx配置,由于nginx配置在docker中,所以需要先获得对应的docker连接
DefaultDockerClientConfig config = DefaultDockerClientConfig.createDefaultConfigBuilder()
//指定 Docker 守护进程地址
//windows中利用docker desktop安装的docker,守护进程地址为"tcp://localhost:2375"
//如果在MAC或者linux环境中,守护进程地址为"unix:///var/run/docker.sock"
.withDockerHost("tcp://localhost:2375")
.build();
//拿到docker 客户端链接
DockerClient dockerClient = DockerClientBuilder.getInstance(config).build();
//拿到nginx在docker中的容器id
String containerId = dockerClient.listContainersCmd()
//根据名称过滤
.withNameFilter(new ArrayList<String>() {{
add(nginxName);
}})
//执行
.exec()
//取第一个容器
.get(0)
//拿到对应容器id
.getId();
//在指定容器里“创建一次待执行的命令会话
ExecCreateCmdResponse execCreateCmdResponse = dockerClient.execCreateCmd(containerId)
.withCmd("nginx", "-s", "reload")
//生成一个“执行句柄”(execCreateCmdResponse,里面有 ID),但命令还没真正跑
.exec();
dockerClient.execStartCmd(execCreateCmdResponse.getId())
//异步跑,但这里不处理输出
.exec(new ResultCallback.Adapter<>())
//异步跑,但这里不处理输出
.awaitCompletion();
dockerClient.close();
}最后有关nginx配置文件内容和刷新nginx配置的总体代码如下
LoadBalancingService.java
package com.zshunbao.gateway.center.domain.docker.service;
import com.github.dockerjava.api.DockerClient;
import com.github.dockerjava.api.async.ResultCallback;
import com.github.dockerjava.api.command.ExecCreateCmdResponse;
import com.github.dockerjava.core.DefaultDockerClientConfig;
import com.github.dockerjava.core.DockerClientBuilder;
import com.zshunbao.gateway.center.domain.docker.model.aggregates.NginxConfig;
import com.zshunbao.gateway.center.domain.docker.model.vo.LocationVO;
import com.zshunbao.gateway.center.domain.docker.model.vo.UpstreamVO;
import org.slf4j.Logger;
import org.slf4j.LoggerFactory;
import org.springframework.beans.factory.annotation.Value;
import org.springframework.stereotype.Service;
import java.io.*;
import java.util.ArrayList;
import java.util.List;
/**
* @program: api-gateway-center
* @ClassName LoadBalancingService
* @description: 负载均衡配置服务实现类
* @author: zs宝
* @create: 2025-09-09 15:06
* @Version 1.0
**/
@Service
public class LoadBalancingService extends AbstractLoadBalancing{
private Logger logger = LoggerFactory.getLogger(LoadBalancingService.class);
@Value("127.0.0.1")
private String default_nginx_server_name;
@Override
protected String createNginxConfigFile(NginxConfig nginxConfig) throws IOException {
//文件内容创建
String nginxConfigContentStr=buildNginxConfig(nginxConfig.getUpstreamList(),nginxConfig.getLocationList());
//创建文件,docker容器内部使用时要修改文件路径
//File file = new File("/nginx/conf/nginx.conf");
// 现在用的是windows本地
File file = new File("F:\\zsbao\\Code\\IDE\\buckstack_project\\API-GateWay\\api-gateway-center\\docs\\dev-ops\\environment\\nginx\\conf\\nginx.conf");
if(!file.exists()){
boolean success = file.createNewFile();
if(success){
logger.info("nginx.conf file created successfully.");
}else {
logger.info("nginx.conf file already exists.");
}
}
//向文件中写入内容
FileWriter writer = new FileWriter(file);
writer.write(nginxConfigContentStr);
writer.close();
//返回结果
return file.getAbsolutePath();
}
private String buildNginxConfig(List<UpstreamVO> upstreamList, List<LocationVO> locationList) {
//nginx.conf基础模版中的内容,在其中流了给负载均衡和方向代理的占位符,
// upstream_config_placeholder,location_config_placeholder
String config = "\n" +
"user nginx;\n" +
"worker_processes auto;\n" +
"\n" +
"error_log /var/log/nginx/error.log notice;\n" +
"pid /var/run/nginx.pid;\n" +
"\n" +
"\n" +
"events {\n" +
" worker_connections 1024;\n" +
"}\n" +
"\n" +
"\n" +
"http {\n" +
" include /etc/nginx/mime.types;\n" +
" default_type application/octet-stream;\n" +
"\n" +
" log_format main '$remote_addr - $remote_user [$time_local] \"$request\" '\n" +
" '$status $body_bytes_sent \"$http_referer\" '\n" +
" '\"$http_user_agent\" \"$http_x_forwarded_for\"';\n" +
"\n" +
" access_log /var/log/nginx/access.log main;\n" +
"\n" +
" sendfile on;\n" +
" #tcp_nopush on;\n" +
"\n" +
" keepalive_timeout 65;\n" +
"\n" +
" #gzip on;\n" +
"\n" +
" #include /etc/nginx/conf.d/*.conf;\n" +
"\n" +
" # 设定负载均衡的服务器列表 命令:docker exec Nginx nginx -s reload\n" +
"upstream_config_placeholder" +
"\n" +
" # HTTP服务器\n" +
" server {\n" +
" # 监听80端口,用于HTTP协议\n" +
" listen 80;\n" +
"\n" +
" # 定义使用IP/域名访问\n" +
" server_name "+default_nginx_server_name+";\n" +
"\n" +
" # 首页\n" +
" index index.html;\n" +
"\n" +
" # 反向代理的路径(upstream绑定),location 后面设置映射的路径\n" +
" # location / {\n" +
" # proxy_pass http://192.168.1.102:9001;\n" +
" # }\n" +
"\n" +
"location_config_placeholder" +
" }\n" +
"}\n";
//接下来分别将负载均衡和反向代理的配置组装进去
//有关负载均衡的
StringBuilder upstreamStr=new StringBuilder();
for(UpstreamVO upstreamVO:upstreamList){
upstreamStr.append("\t").append("upstream").append(" ").append(upstreamVO.getName()).append("{\r\n");
upstreamStr.append("\t").append("\t").append(upstreamVO.getStrategy()).append("\r\n").append("\r\n");
for(String server: upstreamVO.getServers()){
upstreamStr.append("\t").append("\t").append("server").append(" ").append(server).append("\r\n");
}
upstreamStr.append("\t").append("}").append("\r\n").append("\r\n");
}
//有关反向代理的
StringBuilder locationStr = new StringBuilder();
for (LocationVO location : locationList) {
// location /api01/
locationStr.append("\t").append("\t").append("location").append(" ").append(location.getName()).append(" {\r\n");
// rewrite ^/api01/(.*)$ /$1 break; 设置重写URL,在代理后去掉根路径 api01 此字段只是配合路由,不做处理
//locationStr.append("\t").append("\t").append("\t").append("rewrite ^").append(location.getName()).append("(.*)$ /$1 break;").append("\r\n");
// proxy_pass http://api01;
locationStr.append("\t").append("\t").append("\t").append("proxy_pass").append(" ").append(location.getProxy_pass()).append("\r\n");
locationStr.append("\t").append("\t").append("}").append("\r\n").append("\r\n");
}
//将配置组装进去,就是将设定好的占位符替换掉
config=config.replace("upstream_config_placeholder",upstreamStr.toString());
config=config.replace("location_config_placeholder",locationStr.toString());
return config;
}
@Override
protected void refreshNginxConfig(String nginxName) throws InterruptedException, IOException {
//刷新nginx配置,由于nginx配置在docker中,所以需要先获得对应的docker连接
DefaultDockerClientConfig config = DefaultDockerClientConfig.createDefaultConfigBuilder()
//指定 Docker 守护进程地址
//windows中利用docker desktop安装的docker,守护进程地址为"tcp://localhost:2375 without TLS"
//如果在MAC或者linux环境中,守护进程地址为"unix:///var/run/docker.sock"
.withDockerHost("tcp://localhost:2375")
.build();
//拿到docker 客户端链接
DockerClient dockerClient = DockerClientBuilder.getInstance(config).build();
//拿到nginx在docker中的容器id
String containerId = dockerClient.listContainersCmd()
//根据名称过滤
.withNameFilter(new ArrayList<String>() {{
add(nginxName);
}})
//执行
.exec()
//取第一个容器
.get(0)
//拿到对应容器id
.getId();
//在指定容器里“创建一次待执行的命令会话
ExecCreateCmdResponse execCreateCmdResponse = dockerClient.execCreateCmd(containerId)
.withCmd("nginx", "-s", "reload")
//生成一个“执行句柄”(execCreateCmdResponse,里面有 ID),但命令还没真正跑
.exec();
dockerClient.execStartCmd(execCreateCmdResponse.getId())
//异步跑,但这里不处理输出
.exec(new ResultCallback.Adapter<>())
//异步跑,但这里不处理输出
.awaitCompletion();
dockerClient.close();
}
}
对外http接口
LoadBalancingManage.java
package com.zshunbao.gateway.center.interfaces;
import com.alibaba.fastjson.JSON;
import com.zshunbao.gateway.center.application.ILoadBalancingService;
import com.zshunbao.gateway.center.domain.docker.model.aggregates.NginxConfig;
import com.zshunbao.gateway.center.domain.docker.model.vo.LocationVO;
import com.zshunbao.gateway.center.domain.docker.model.vo.UpstreamVO;
import org.slf4j.Logger;
import org.slf4j.LoggerFactory;
import org.springframework.web.bind.annotation.GetMapping;
import org.springframework.web.bind.annotation.RequestMapping;
import org.springframework.web.bind.annotation.RestController;
import javax.annotation.Resource;
import java.util.ArrayList;
import java.util.Arrays;
import java.util.List;
/**
* @program: api-gateway-center
* @ClassName LoadBalancingManage
* @description: 刷新nginx配置对外接口
* @author: zs宝
* @create: 2025-09-09 16:05
* @Version 1.0
**/
@RestController
@RequestMapping("/wg/admin/load")
public class LoadBalancingManage {
private Logger logger = LoggerFactory.getLogger(GatewayConfigManage.class);
@Resource
private ILoadBalancingService loadBalancingService;
@GetMapping(value = "updateNginxConfig", produces = "application/json;charset=utf-8")
public void updateNginxConfig() {
List<UpstreamVO> upstreamList = new ArrayList<>();
upstreamList.add(new UpstreamVO("api01", "least_conn;", Arrays.asList("host.docker.internal:9001;", "host.docker.internal:9002;")));
upstreamList.add(new UpstreamVO("api02", "least_conn;", Arrays.asList("host.docker.internal:9003;")));
List<LocationVO> locationList = new ArrayList<>();
locationList.add(new LocationVO("/api01/", "http://api01;"));
locationList.add(new LocationVO("/api02/", "http://api02;"));
NginxConfig nginxConfig = new NginxConfig(upstreamList, locationList);
try {
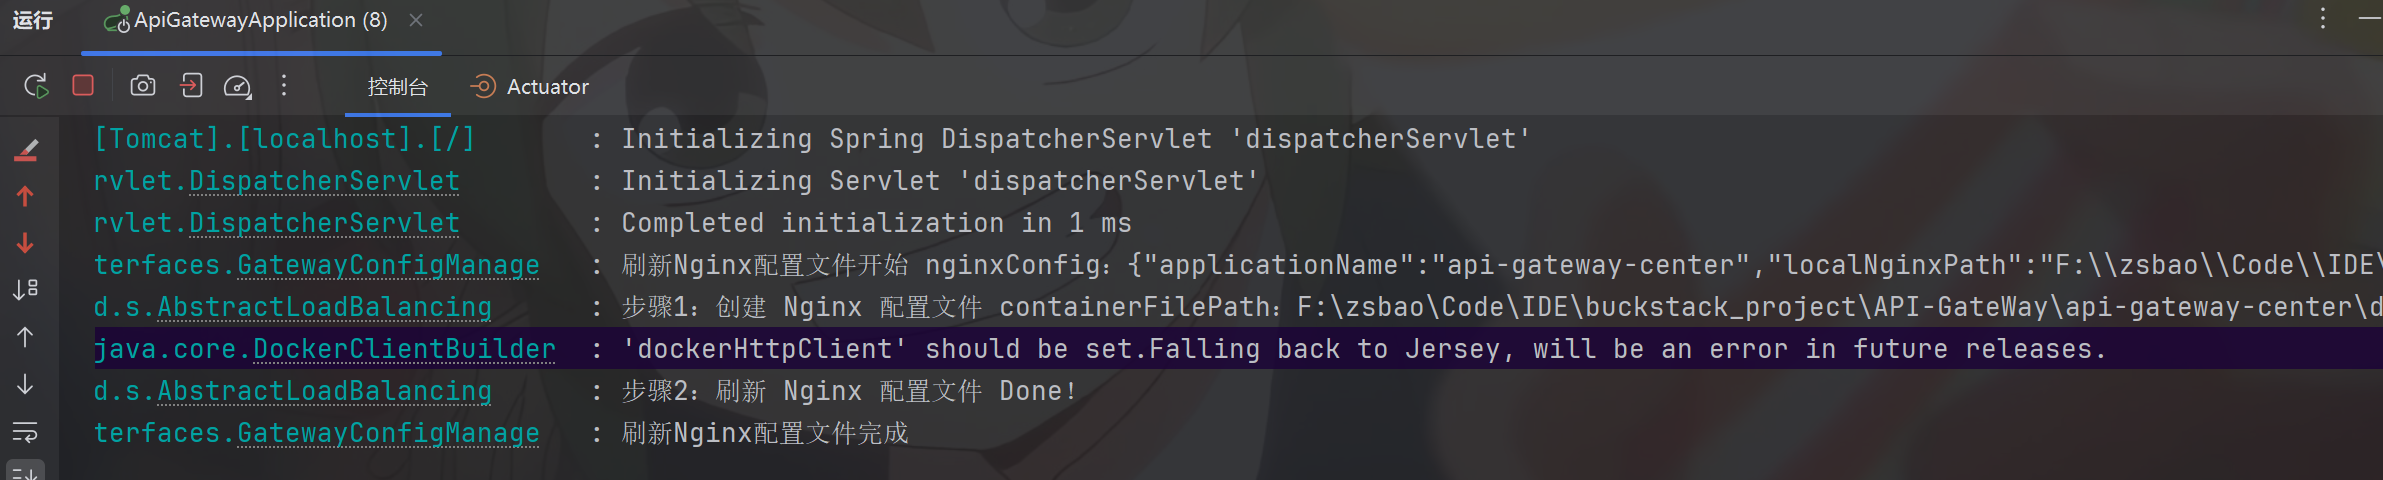
logger.info("刷新Nginx配置文件开始 nginxConfig:{}", JSON.toJSONString(nginxConfig));
loadBalancingService.updateNginxConfig(nginxConfig);
logger.info("刷新Nginx配置文件完成");
}catch (Exception e){
logger.error("刷新Nginx配置文件失败", e);
}
}
}
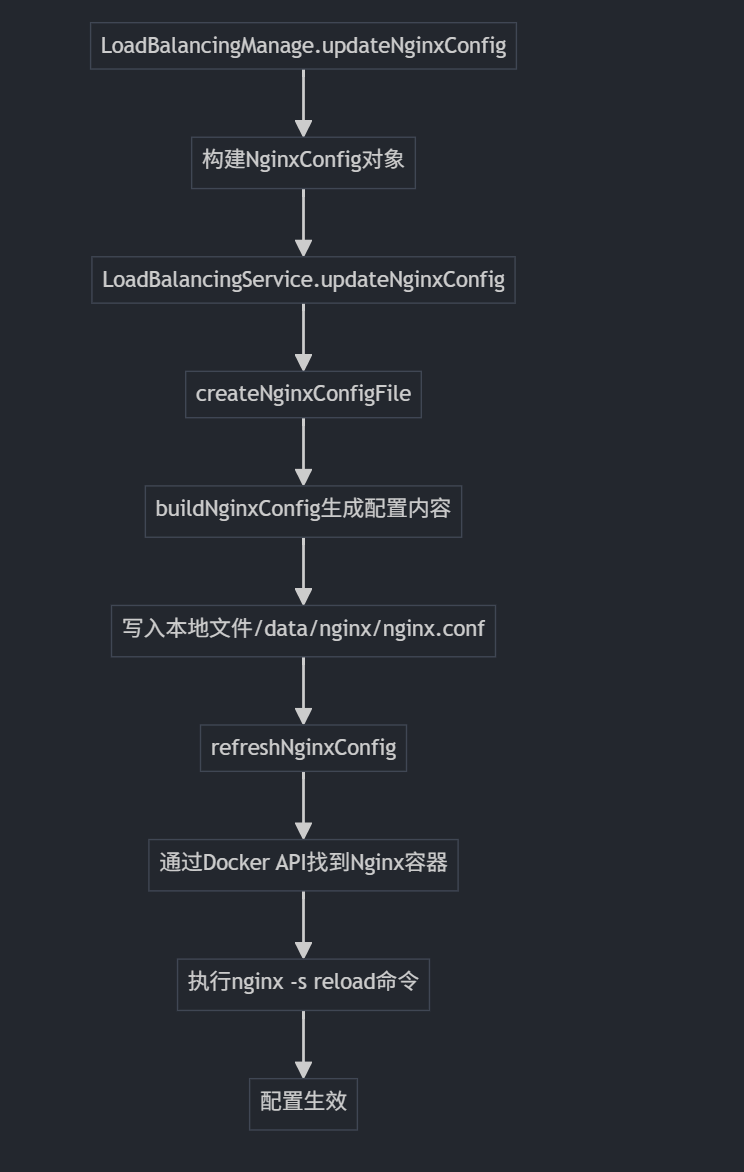
总体流程如下
测试
使用NetAssist 3.8.2进行模拟3组API服务,与25章相同
docker重新创建nginx服务,初始时,nginx配置文件中无负载均衡配置和反向代理配置
nginx配置如下
user nginx;
worker_processes auto;
error_log /var/log/nginx/error.log notice;
pid /var/run/nginx.pid;
events {
worker_connections 1024;
}
http {
include /etc/nginx/mime.types;
default_type application/octet-stream;
log_format main '$remote_addr - $remote_user [$time_local] "$request" '
'$status $body_bytes_sent "$http_referer" '
'"$http_user_agent" "$http_x_forwarded_for"';
access_log /var/log/nginx/access.log main;
sendfile on;
#tcp_nopush on;
keepalive_timeout 65;
#gzip on;
#include /etc/nginx/conf.d/*.conf;
# 设定负载均衡的服务器列表 命令:docker exec Nginx nginx -s reload
# HTTP服务器
server {
# 监听80端口,用于HTTP协议
listen 80;
# 定义使用IP/域名访问
server_name 127.0.0.1;
# 首页
index index.html;
# 反向代理的路径(upstream绑定),location 后面设置映射的路径
# location / {
# proxy_pass http://192.168.1.102:9001;
# }
}
}
启动网关注册中心
在没有调用刷新nginx配置之前,无论是访问http://localhost:8090/api01/还是http://localhost:8090/api02/,都无法获得响应,且NetAssist 3.8.2进行模拟3组API服务也没有接受到任何请求
然后我们调用刷新nginx的对外http接口

查看挂载文件的配置佩蓉如下
user nginx;
worker_processes auto;
error_log /var/log/nginx/error.log notice;
pid /var/run/nginx.pid;
events {
worker_connections 1024;
}
http {
include /etc/nginx/mime.types;
default_type application/octet-stream;
log_format main '$remote_addr - $remote_user [$time_local] "$request" '
'$status $body_bytes_sent "$http_referer" '
'"$http_user_agent" "$http_x_forwarded_for"';
access_log /var/log/nginx/access.log main;
sendfile on;
#tcp_nopush on;
keepalive_timeout 65;
#gzip on;
#include /etc/nginx/conf.d/*.conf;
# 设定负载均衡的服务器列表 命令:docker exec Nginx nginx -s reload
upstream api01{
least_conn;
server host.docker.internal:9001;
server host.docker.internal:9002;
}
upstream api02{
least_conn;
server host.docker.internal:9003;
}
# HTTP服务器
server {
# 监听80端口,用于HTTP协议
listen 80;
# 定义使用IP/域名访问
server_name 127.0.0.1;
# 首页
index index.html;
# 反向代理的路径(upstream绑定),location 后面设置映射的路径
# location / {
# proxy_pass http://192.168.1.102:9001;
# }
location /api01/ {
proxy_pass http://api01;
}
location /api02/ {
proxy_pass http://api02;
}
}
}
然后再次访问http://localhost:8090/api01/,或者http://localhost:8090/api02/

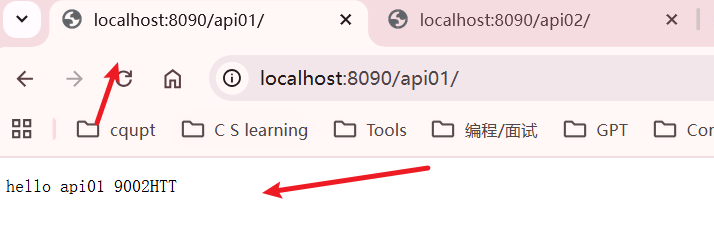
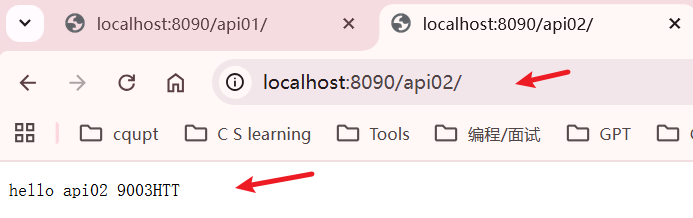
测试成功